
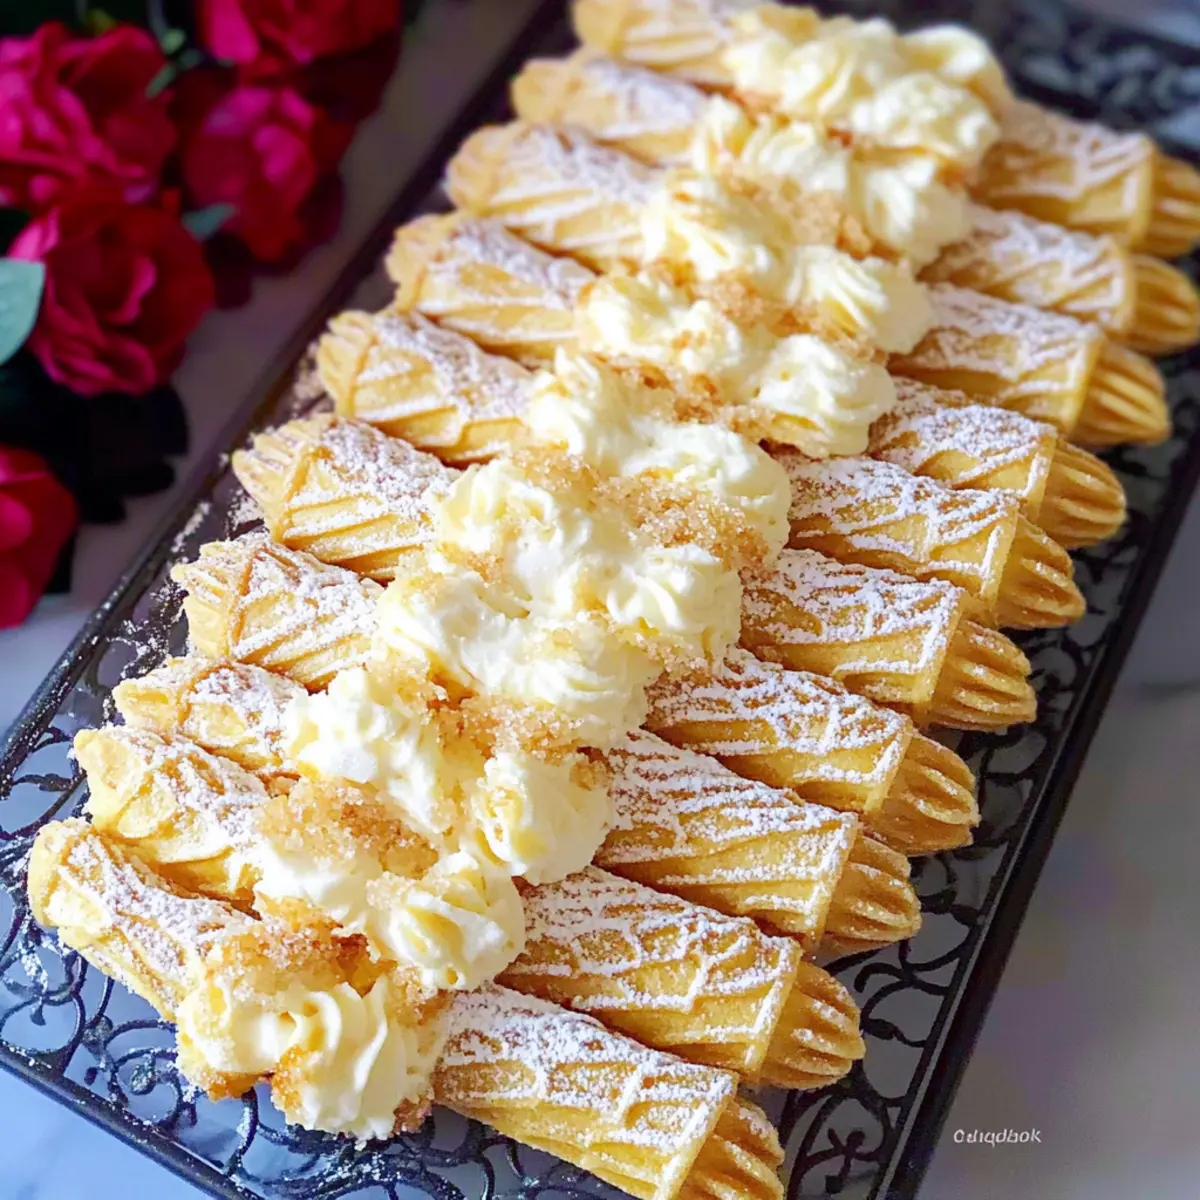
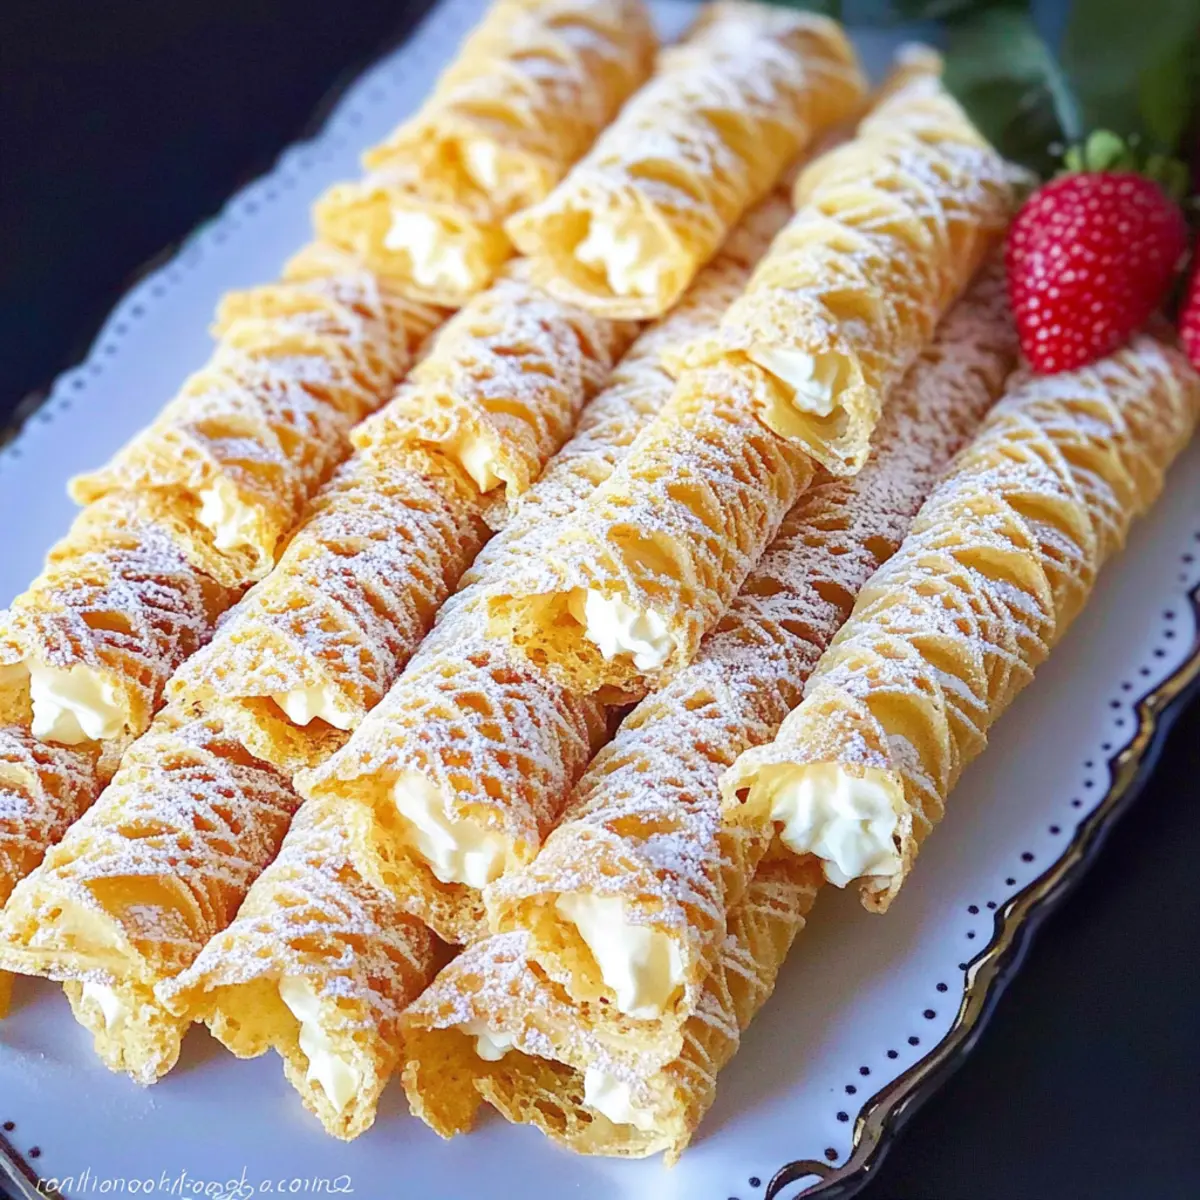
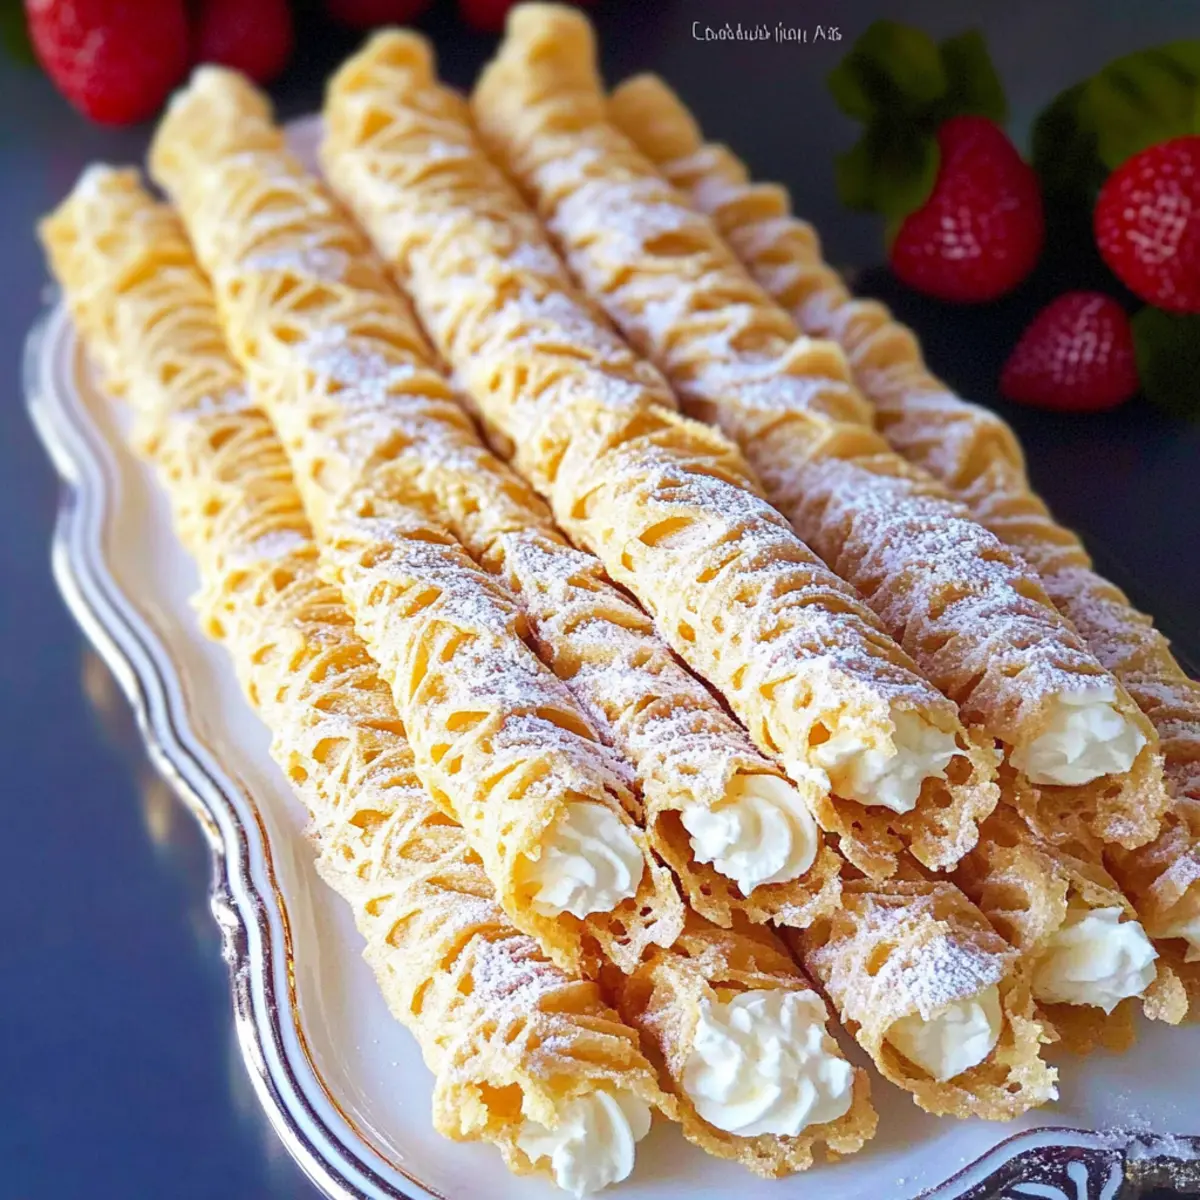
The rich aroma of freshly made pizzelles wafts through the air, instantly transporting me to festive celebrations filled with laughter and joy. Today, I’m thrilled to share my rendition of Cream Filled Pizzelles (Trubochki), those elegant, waffle-like pastries that are not only a delight to the eyes but also to the palate. With their crispy exterior and a creamy filling made from sweetened condensed milk, these treats are perfect for creating lasting memories at your holiday gatherings. Plus, they’re a breeze to make, which means less time stressing in the kitchen and more time connecting with loved ones. So, why not indulge in some homemade goodness? Your taste buds will thank you! Ready to roll up your sleeves and dive into this delightful recipe?

Why Are Cream Filled Pizzelles Irresistible?
Crispy Delight: The combo of a light, crispy exterior with a creamy filling creates a dessert experience like no other. You’ll love the textural contrast as you bite into these Italian delicacies.
Easy to Make: Even if you’re new to baking, these pizzelles come together quickly, ensuring you can whip them up without any fuss. Perfect for when unexpected guests drop by!
Festive Appeal: Whether it’s a holiday, wedding, or just a family gathering, these elegant treats bring festive cheer and are sure to impress everyone around the table.
Versatile Filling: Feel free to experiment with various cream fillings, maybe even trying a mascarpone twist or a different flavored whipped topping for a unique twist!
Make Ahead Convenience: You can bake the pizzelles in advance and fill them just before serving, making them a time-saver when prepping for large gatherings. Discover how easy and enjoyable dessert prep can be with these delightful Cream Filled Pizzelles, reminiscent of a comforting Sugar Cream Pie with an inviting twist!
Cream Filled Pizzelles Ingredients
For the Batter
- 4 large eggs – Provides structure and moisture; use room-temperature eggs for better emulsification.
- 1/4 cup granulated sugar – Adds sweetness and helps aerate the batter.
- 1/4 teaspoon fine salt – Enhances flavor balance.
- 2 tablespoons grapeseed oil – Adds moisture; substitute with melted unsalted butter for a crispier texture.
- 1/2 teaspoon vanilla extract – Introduces a warm, aromatic flavor.
- 1 cup all-purpose flour – Gives structure; sifted to avoid lumps and ensure fluffiness.
For the Filling
- 8 oz cream cheese (refrigerated) – Base for the filling, providing richness and stability.
- 1/3 cup sweetened condensed milk (refrigerated) – Adds sweetness and creamy texture, making these Cream Filled Pizzelles delectable.
- 8 oz cool whip (frozen) – Contributes lightness and volume to the filling; use extra creamy for best results.
- 1/4 teaspoon vanilla extract (for filling) – Enhances the flavor profile of the cream filling.
- 1 tablespoon powdered sugar (optional for dusting) – Provides a decorative touch when serving.
Step‑by‑Step Instructions for Cream Filled Pizzelles
Step 1: Preheat the Pizzelle Maker
Begin by preheating your pizzelle maker according to the manufacturer’s instructions. This usually takes about 5 minutes. Make sure it reaches a consistent medium-high heat—this is crucial for creating those beautifully crisp Cream Filled Pizzelles. As it heats, gather all your ingredients and equipment to streamline the process.
Step 2: Prepare the Batter
In a medium mixing bowl, crack 4 large eggs and whisk in 1/4 cup granulated sugar and 1/4 teaspoon fine salt. Beat the mixture until it turns light in color and fluffy, which should take about 3-5 minutes. Next, stir in 2 tablespoons of grapeseed oil and 1/2 teaspoon of vanilla extract, followed by 1 cup of sifted all-purpose flour. Mix until just combined for a smooth batter.
Step 3: Bake the Pizzelles
Once the batter is ready, spoon 1 tablespoon of the mixture onto the preheated pizzelle maker, close the lid, and bake for 18-20 seconds. Look for a deep golden-brown color to ensure they are perfectly cooked. Carefully open the maker and gently remove the pizzelle using a fork, being cautious as the hot surface can be tricky.
Step 4: Shape the Pizzelles
Immediately after removing each pizzelle from the maker, roll it around a wooden stick to form a tube shape. This should be done quickly while they are still warm and pliable to give them their signature form. Repeat this process until all the batter is used, placing the shaped pizzelles on a baking sheet to cool down.
Step 5: Cool the Pizzelles
Allow the rolled pizzelles to cool on the baking sheet for about 4-5 hours until they are completely crisp. Avoid stacking them during this time to prevent any moisture from making them soggy. Once cooled, you can prepare the delicious filling while waiting.
Step 6: Whip Up the Filling
In a clean mixing bowl, beat 8 oz of refrigerated cream cheese until smooth and fluffy. Gradually add in 1/3 cup of sweetened condensed milk and 1/4 teaspoon of vanilla extract for added flavor. Once combined, gently fold in 8 oz of cool whip until thick and creamy. This luscious filling is what will take your Cream Filled Pizzelles to the next level!
Step 7: Fill the Pizzelles
Using a piping bag or a spoon, generously fill each cooled pizzelle tube with the creamy mixture. Be sure to fill them well but not overstuff; you want them to be stable. If desired, dust the top with a sprinkle of powdered sugar for a touch of elegance and sweetness.
Step 8: Serve and Enjoy
For the best experience, refrigerate your filled Cream Filled Pizzelles until you’re ready to serve. Ideally, fill them just before serving to maintain that perfect crispiness. When ready to enjoy, place them on a platter and relish the delighted faces of your family and friends!
Expert Tips for Cream Filled Pizzelles
Crispy Texture: Ensure the pizzelles are baked until just dark golden to achieve a crispy exterior that holds up to the creamy filling.
Proper Cooling: Cool the pizzelles in a single layer for at least 4-5 hours, keeping them unstacked to prevent moisture buildup, which can lead to sogginess.
Fill Before Serving: To maintain the delightful crunch of your Cream Filled Pizzelles, only fill them shortly before serving, avoiding any sogginess from premature filling.
Chill the Filling: If your cream filling seems too runny, pop it in the refrigerator for 30-60 minutes. This helps it thicken for easy piping.
Experiment with Flavors: Don’t shy away from altering the base flavors—try different extracts like almond or orange for a unique twist on this classic dessert.
What to Serve with Cream Filled Pizzelles
Complement your delightful dessert with pairings that elevate the experience and tantalize your taste buds.
-
Fresh Berries: A medley of strawberries, raspberries, and blueberries adds a burst of freshness, balancing the richness of the creamy filling.
-
Coffee or Espresso: The robust flavors of coffee or a shot of espresso create a perfect contrast to the sweetness, making for a sophisticated pairing.
-
Chocolate Drizzle: A light drizzle of melted dark chocolate enhances the elegance of these pizzelles, providing a rich, indulgent flavor that complements the creamy filling beautifully.
-
Whipped Cream: A dollop of fresh whipped cream adds a fluffy texture that contrasts wonderfully with the crunchy pizzelles, enhancing each bite’s creaminess.
-
Ice Cream: Serve these pizzelles alongside a scoop of vanilla or hazelnut ice cream for a delightful combination of temperatures and flavors — simply heavenly!
-
Fruit Sorbet: The light, fruity flavors of sorbet clean the palate after each decadent bite, refreshing the senses and inviting another taste.
-
Sparkling Wine: Pair with a sweet sparkling wine for a festive touch. Its bubbles and notes will elevate the experience, making it feel like a true celebration.
How to Store and Freeze Cream Filled Pizzelles
Room Temperature: Keep baked pizzelles in an airtight container for up to 3 days. Layer them with parchment paper to prevent sticking.
Fridge: If filled, store in the refrigerator for up to 2 days. This keeps the Cream Filled Pizzelles fresh but may soften the crispness slightly.
Freezer: Baked pizzelles can be frozen for up to 2 months. Place them in a freezer-safe container or bag with layers of parchment paper. Avoid filling before freezing to maintain texture.
Reheating: To refresh frozen pizzelles, allow them to thaw in the fridge overnight, then warm in a preheated oven for a few minutes before serving.
Make Ahead Options
These Cream Filled Pizzelles are a fantastic option for meal prep, allowing you to enjoy homemade sweets without the stress on the day of your gathering! You can bake the pizzelles up to 3 days in advance. Simply let them cool completely and store them in an airtight container at room temperature, separating layers with parchment paper to prevent sticking. As for the filling, prepare it ahead of time and refrigerate it for up to 24 hours. When you’re ready to serve, just pipe the filling into each tube, making sure to fill them just before serving to keep that delightful crispiness intact. With these make-ahead tips, you’ll have a beautiful dessert with minimal last-minute effort!
Cream Filled Pizzelles Variations & Substitutions
Feel free to get creative with these delightful treats! Here are some fun twists to elevate your Cream Filled Pizzelles experience.
-
Flavorful Extracts: Swap out vanilla for almond or orange extract in both the batter and filling for a unique taste sensation. The subtle hints of almond or zest can transport you to new flavor realms!
-
Cheesy Creamy Blend: For the filling, try mixing cream cheese with mascarpone cheese for an extra creamy texture and a rich flavor twist. Each bite will be even more luxurious!
-
Fruit Puree Addition: Fold in a bit of fruit puree, like raspberry or strawberry, into the filling for a touch of fruity goodness. It adds a beautiful color and refreshing taste that complements the sweetness perfectly.
-
Chocolate Surprise: Mix in mini chocolate chips to the cream filling for a scrumptious chocolatey burst. The playful contrast of creamy and chocolatey goodness is sure to delight chocolate lovers!
-
Cinnamon Spice: Add a pinch of ground cinnamon to the batter for a warm, cozy feel. This subtly sweet spice can turn your pizzelles into festive treats that remind you of holiday baking.
-
Nutty Substitution: Incorporate finely chopped nuts, such as walnuts or pistachios, into the filling for added texture and flavor. The crunch pairs beautifully with the softness of the cream!
-
Dairy-Free Option: Replace cream cheese with vegan cream cheese and use coconut whipped cream instead of cool whip for a delicious dairy-free version. You won’t sacrifice flavor or texture with this swap!
-
Extra Crispy Twist: For a crunchier texture, sprinkle a little finely crushed cornflakes or toasted coconut on top of each filled pizzelle. This simple addition adds an exciting crunch that takes them over the top!
With these variations and substitutions, you can make your Cream Filled Pizzelles a personalized treat that’s sure to impress and warm hearts. If you’re feeling inspired, why not try pairing them with a side of Creamed Peas Comforting for a delightful meal?
Cream Filled Pizzelles Recipe FAQs
What kind of eggs should I use for the pizzelle batter?
I recommend using large, room-temperature eggs for the best results. Room-temperature eggs emulsify better into the batter, contributing to a lighter and fluffier end product.
How should I store leftover Cream Filled Pizzelles?
If you have filled pizzelles, store them in the refrigerator for up to 2 days. While they remain delicious, keep in mind that they may lose some of their crispiness. If you have baked but unfilled pizzelles, keep them in an airtight container at room temperature for up to 3 days, layering them with parchment paper to prevent sticking.
Can I freeze Cream Filled Pizzelles?
Absolutely! You can freeze the baked pizzelles for up to 2 months. To do this, place them in a freezer-safe container or bag with layers of parchment paper to avoid sticking. Just remember not to fill them before freezing; fill them after thawing to maintain their crispy texture.
What should I do if the filling is too runny?
If your cream filling turns out runny, don’t worry! Simply refrigerate it for about 30-60 minutes to allow it to thicken. This makes it easier to pipe or spoon into the pizzelles without making them soggy.
Are Cream Filled Pizzelles suitable for people with allergies?
Great question! This recipe contains dairy (cream cheese and Cool Whip), gluten (all-purpose flour), and eggs. If you’re serving guests with allergies, consider substituting the cream cheese with a dairy-free alternative and using gluten-free flour. Always check labels for any potential allergens!
Delightful Cream Filled Pizzelles: Your New Favorite Treat!
Ingredients
Equipment
Method
- Preheat your pizzelle maker according to the manufacturer's instructions, reaching medium-high heat.
- In a medium mixing bowl, whisk together eggs, granulated sugar, and fine salt until light and fluffy for about 3-5 minutes.
- Stir in grapeseed oil and vanilla extract, then mix in sifted all-purpose flour until just combined.
- Spoon 1 tablespoon of batter onto the preheated pizzelle maker and bake for 18-20 seconds until golden brown.
- Remove the pizzelle with a fork and immediately roll it around a wooden stick to form a tube shape.
- Allow the rolled pizzelles to cool on a baking sheet for 4-5 hours.
- In a clean bowl, beat cream cheese until smooth, gradually adding sweetened condensed milk and vanilla extract, then fold in cool whip.
- Fill each cooled pizzelle tube with the cream mixture using a piping bag or spoon and dust with powdered sugar if desired.
- Refrigerate filled pizzelles until ready to serve, ideally just before serving to maintain crispiness.
Leave a Reply