
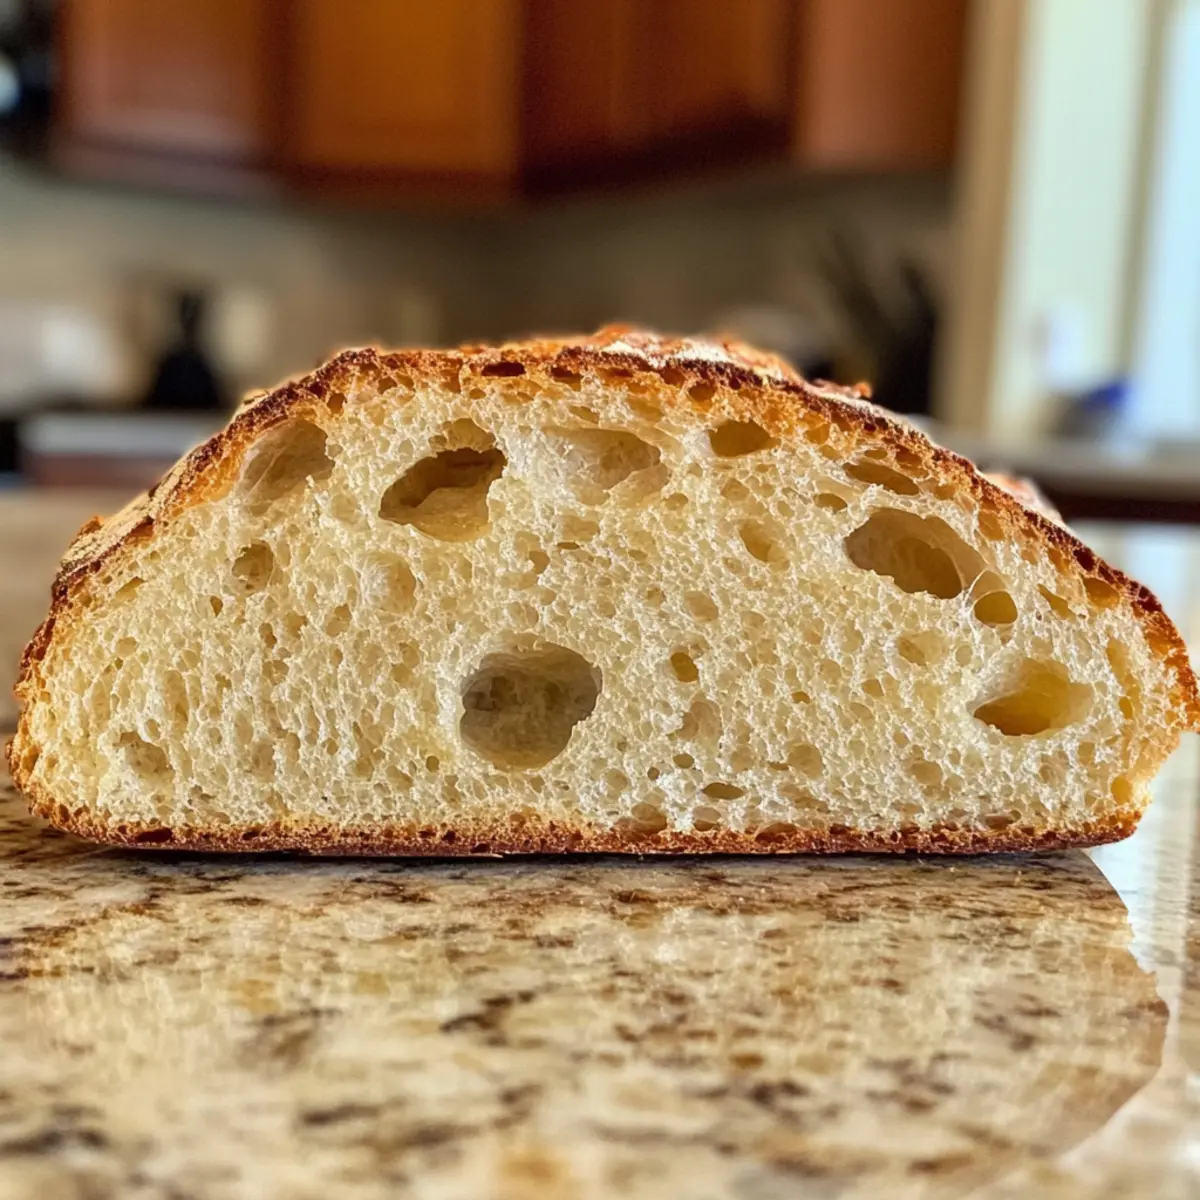
The aroma of fresh bread wafting through the kitchen is an invitation to joy, isn’t it? I can almost feel the warmth of the loaf resting on the counter, enticing me with its golden, crusty exterior. Today’s delight is the World’s Easiest Yeast Bread, a no-knead artisan recipe that brings bakery-quality magic right to your home. With just a few simple ingredients and minimal effort, you can craft a soft and airy loaf that’s perfect for toasting or enjoying with your favorite soup. This bread is not only beginner-friendly but also relatively low in calories at around 155 per slice, making it a guilt-free indulgence. So, whether you’re an aspiring home baker or simply looking to elevate your dinner table, this recipe is your ticket to culinary creativity. Curious about how to make this effortless bread? Let’s dive in!
Want to Bake Fluffy Yeast Bread?
Simplicity at its finest: This no-knead approach means you can enjoy fresh artisan bread without the fuss of traditional techniques.
Irresistible aroma: The scent of baking bread fills your home, creating a warm and inviting atmosphere.
Versatile enjoyment: Whether for breakfast toast, a hearty sandwich, or a side with soup, this bread fits perfectly into any meal. Explore more delicious options like Sprinkle Buttermilk Bread or Roasted Pear Flatbread to accompany your loaf.
Crowd-pleaser: Impress family and friends with a bakery-quality loaf made right in your kitchen, effortlessly!
Time-saving: With minimal hands-on time, you’ll have a delightful loaf ready with very little effort.
Yeast Bread Ingredients
For the Dough
• Flour – Use all-purpose flour for a tender bread, or opt for bread flour for a chewier texture.
• Yeast – Active dry yeast is recommended; dissolve it in water for better activation.
• Salt – It enhances flavor and controls yeast activity; reduce table salt to 1 1/4 tsp for the right balance.
• Water – Warm water is best as it activates the yeast, creating the ideal dough texture.
Optional Enhancements
• Herbs or Spices – Mix in herbs like rosemary or spices such as garlic powder for an aromatic twist.
• Seeds – Add seeds like sesame or poppy on top for an extra crunch and visual appeal.
• Cheese – Incorporating cheese, like shredded cheddar or feta, can elevate the flavor profile of your yeast bread.
Step‑by‑Step Instructions for Yeast Bread
Step 1: Mix Dry Ingredients
In a large mixing bowl, combine 3 cups of flour, 1 teaspoon of active dry yeast, and 1.5 teaspoons of salt. Stir the dry ingredients together with a wooden spoon until evenly blended. This simple step creates the foundation for your yeast bread, ensuring consistent flavor throughout the loaf.
Step 2: Add Water
Pour in 1.5 cups of warm water, stirring continuously with your wooden spoon. Mix until there are no dry flour patches left and the dough appears sticky and shaggy. Take your time here; the warmth of the water activates the yeast, which is crucial for that delightful rise, so don’t rush!
Step 3: Let the Dough Rise
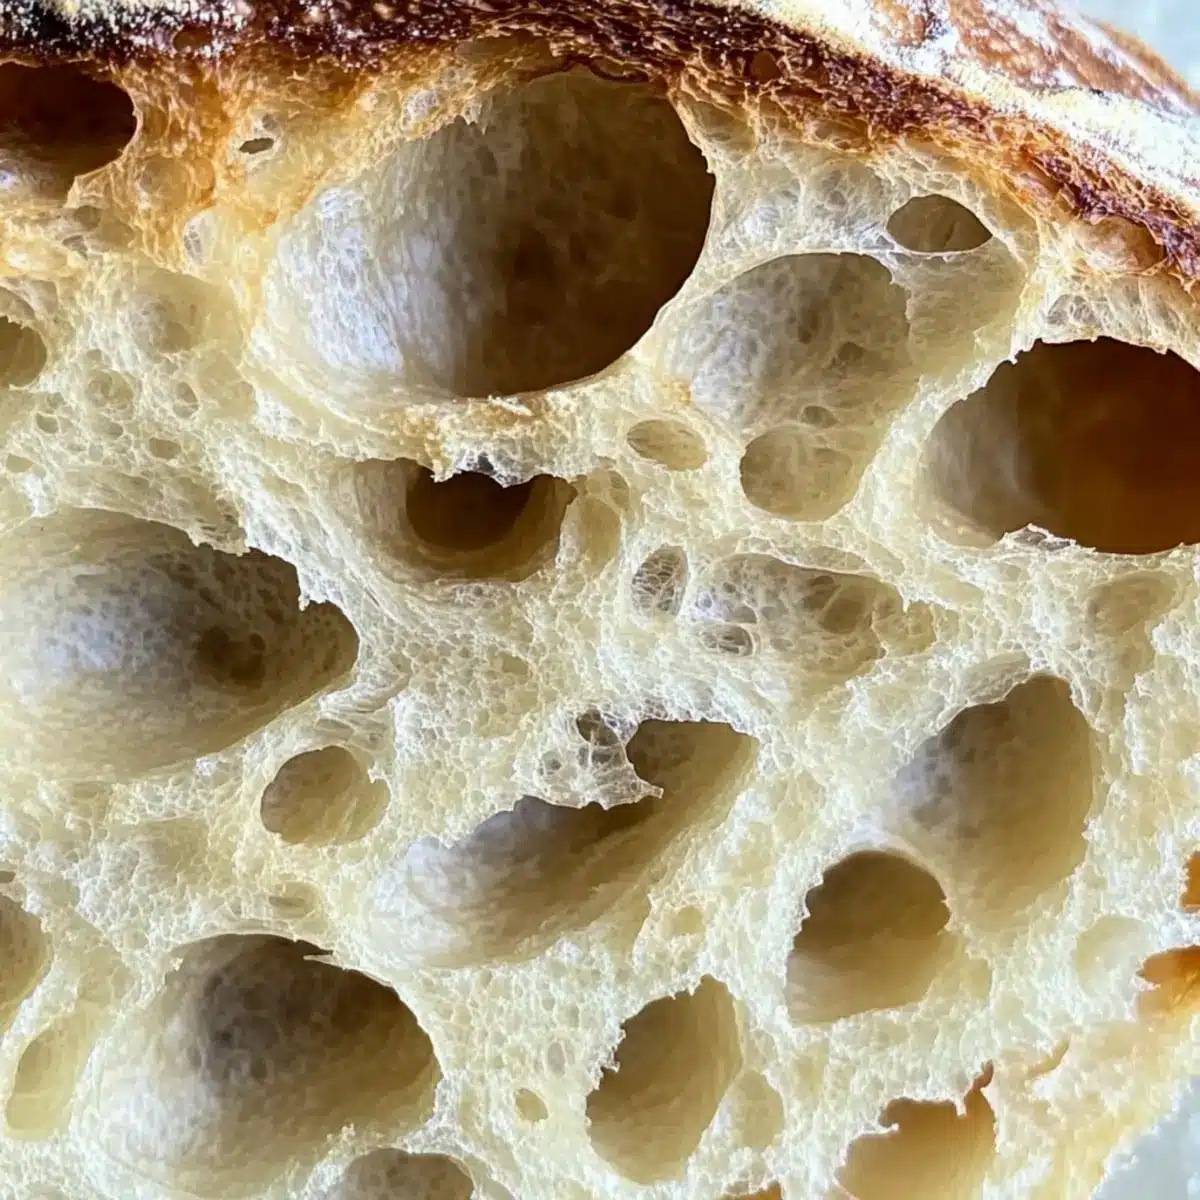
Cover the bowl tightly with plastic wrap or a clean kitchen towel and set it in a warm area for 2 to 3 hours. This resting period allows your yeast bread dough to double in size and develop bubbles on the surface. You’ll know it’s ready when it has grown significantly and looks airy and bubbly.
Step 4: Optional Refrigeration
If you prefer a deeper flavor, you can pop the bowl into the refrigerator for up to 3 days. This aging process adds complexity to your yeast bread. When you’re ready to bake, let the dough come to room temperature for about 45–60 minutes before proceeding to the next step.
Step 5: Preheat the Oven
Around 30 minutes before baking, place a Dutch oven into your oven and preheat to 450°F (230°C). Heating the Dutch oven ensures your yeast bread gets that perfect crust while baking. It’s crucial for achieving a bakery-style loaf, so don’t skip this step!
Step 6: Shape the Dough
Lightly dust a clean work surface with 1 tablespoon of flour and carefully scrape the risen dough onto it. Gently sprinkle another 1/2 tablespoon of flour on top of the dough. Avoid overworking the dough; you just need to shape it lightly without deflating all the airiness you created during the rise.
Step 7: Form a Round Shape
Gently fold the dough over itself about six times to create a rough round shape. The idea is to maintain the air bubbles while giving it some structure for the final rise. Your yeast bread dough should feel soft and pliable, ready for its next stage of transformation.
Step 8: Prepare for Baking
Transfer the dough seam-side down onto a piece of parchment paper. This will make it easy to move into the hot Dutch oven without losing shape. Make sure the parchment paper is large enough to handle the loaf without it sticking.
Step 9: Bake Covered
Carefully lift the parchment with the dough and place it into the preheated Dutch oven. Cover it with the lid and bake for 30 minutes. The lid traps steam, creating a moist environment that helps your yeast bread achieve its signature crust and fluffy interior.
Step 10: Bake Uncovered
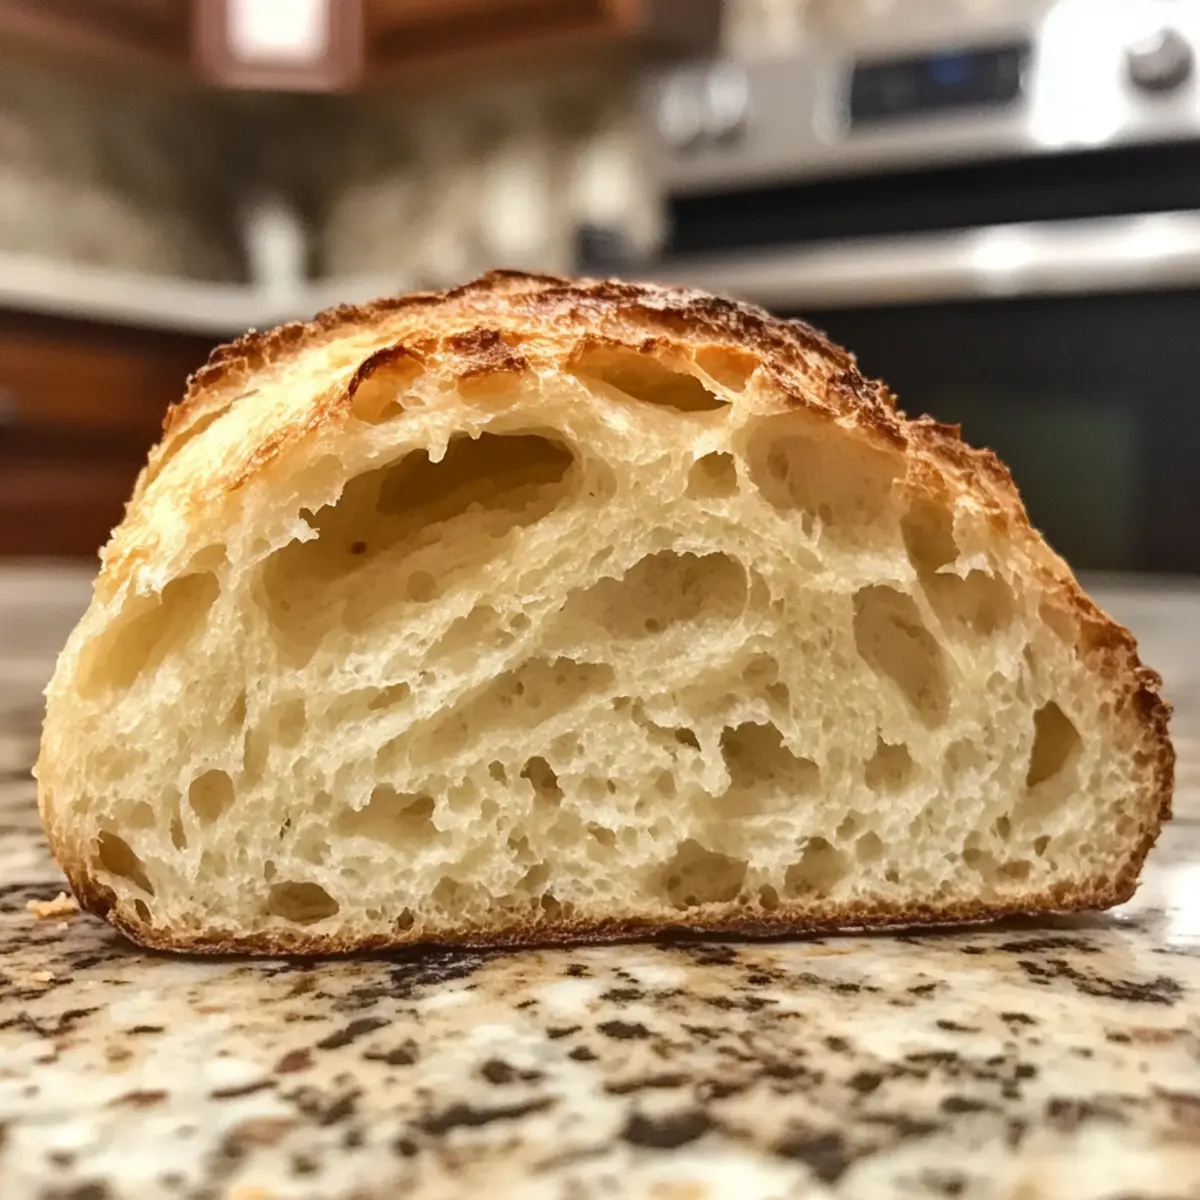
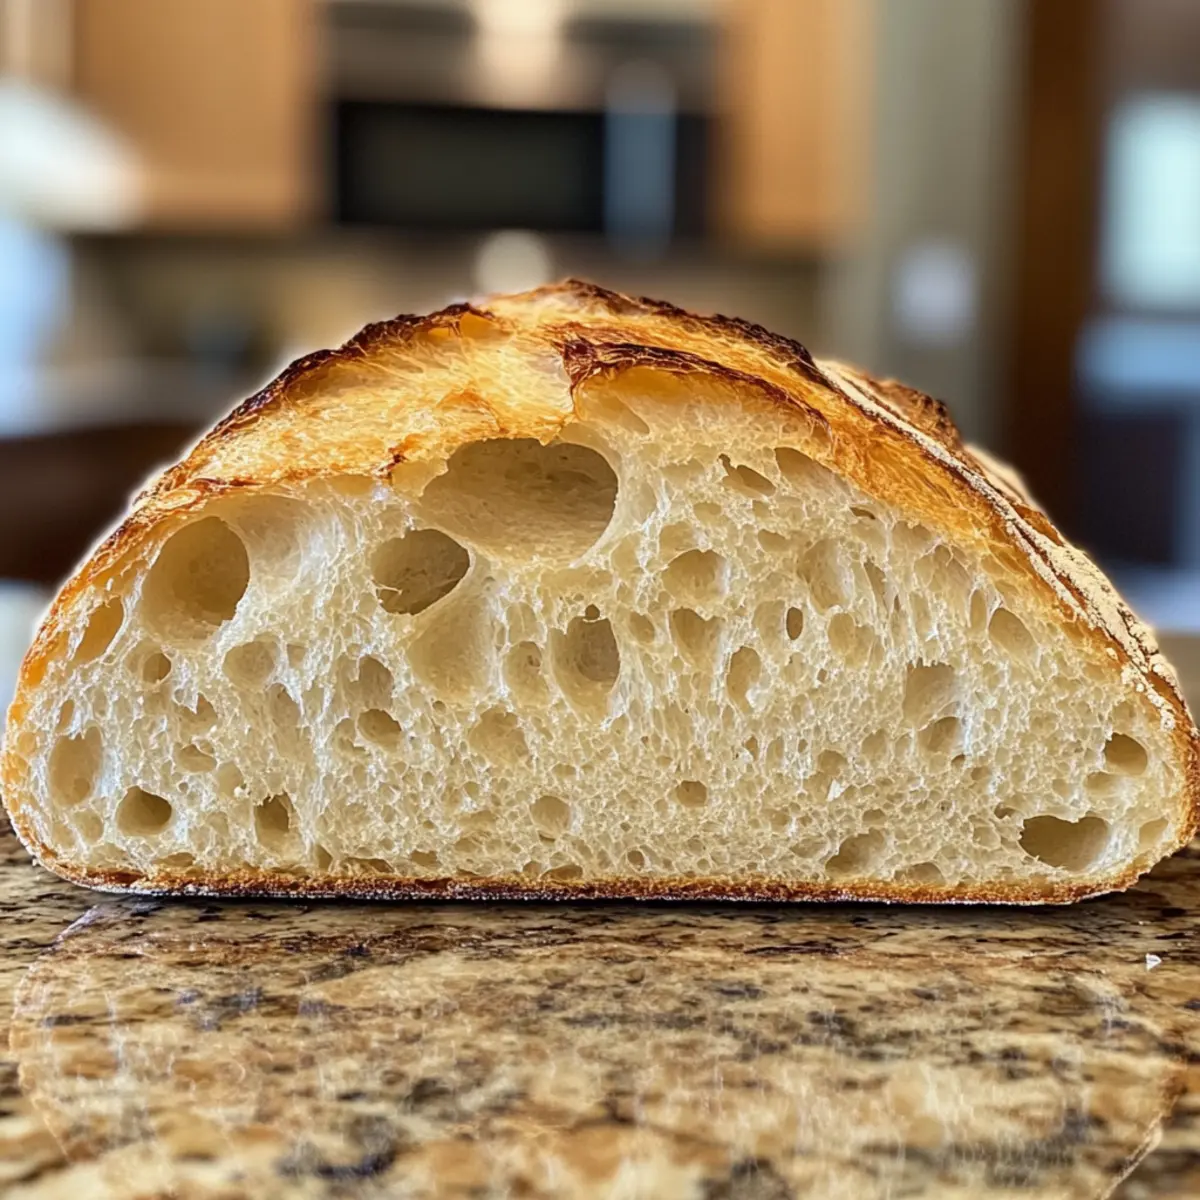
After 30 minutes, remove the lid and continue baking for an additional 12 minutes until the bread turns a deep, golden brown. Keep an eye on the color; it should have a beautiful crust that promises a delightful crunch when you slice into it.
Step 11: Cool Before Slicing
Remove your freshly baked yeast bread from the Dutch oven and let it cool on a wire rack for about 10 minutes. This cooling period is essential to set the crumb and enhance the flavor. The aroma wafting from the loaf is a reward for your efforts!
What to Serve with No-Knead Artisan Yeast Bread
The warm, inviting aroma of freshly baked bread can elevate any meal, beckoning you to create a satisfying dining experience.
- Creamy Tomato Soup: The rich flavors of tomato soup paired with this crusty bread create a classic combination that warms the soul.
- Savory Cheese Platter: Complement your yeast bread with an assortment of cheeses, olives, and nuts for a delightful appetizer spread.
- Roasted Veggies: The natural sweetness of roasted vegetables contrasts beautifully with the bread’s crust, adding vibrant colors to your table. A mix of carrots, beets, and bell peppers drizzled with olive oil is perfect!
- Herbed Butter: Spread homemade herb-infused butter on warm slices to enhance the flavor of your bread, making it an irresistible side.
- Hearty Salad: Pair with a refreshing spinach or arugula salad topped with nuts and fruits; the textures balance perfectly with the chewy bread.
- Fresh Fruit Preserve: Enjoy your yeast bread with a sweet touch by topping it with fruit preserves or honey for a delightful breakfast or snack!
- Sparkling Water or Wine: A glass of refreshing sparkling water or a light white wine beautifully accompanies the bread, providing a touch of elegance to your meal.
- Chocolate Mousse: End your meal on a sweet note with a rich chocolate mousse; its creamy texture contrasts deliciously with the bread’s crusty exterior.
How to Store and Freeze Yeast Bread
Room Temperature: Store your yeast bread in a breadbox or wrapped in a clean kitchen towel for up to 2 days to maintain freshness and prevent it from drying out.
Fridge: Avoid refrigerating your yeast bread as it can lead to faster staling. Instead, keep it at room temperature to ensure a soft texture.
Freezer: For longer storage, freeze slices of yeast bread in a resealable freezer bag for up to 3 months. To prevent freezer burn, press out excess air before sealing.
Reheating: To enjoy your frozen yeast bread, thaw it overnight in the fridge, then pop slices in the toaster or oven briefly to refresh their crusty exterior.
Make Ahead Options
These no-knead artisan yeast bread options are perfect for busy home cooks looking to save time during the week! You can prepare the dough up to 3 days in advance, allowing the flavors to deepen and develop while refrigerated. After mixing your ingredients, simply cover the bowl tightly with plastic wrap and store it in the fridge. When you’re ready to bake, let the dough sit at room temperature for 45–60 minutes before proceeding with the shaping and baking steps. This method not only ensures you have fresh, bakery-quality bread with minimal effort but also keeps it just as delicious and fluffy, making your meal planning a breeze!
Yeast Bread Variations & Substitutions
Feel free to customize this delightful yeast bread to suit your taste and dietary preferences with these exciting variations!
- Whole Wheat: Substitute half of the all-purpose flour with whole wheat flour for a nuttier flavor and added nutrition.
- Herb-Infused: Add 1-2 tablespoons of dried herbs like rosemary or thyme to the dry ingredients for an aromatic twist that will fill your kitchen with a lovely, comforting scent.
- Cheese Lover’s Delight: Mix in 1 cup of shredded cheese like cheddar or feta for a flavorful, cheesy loaf—perfect for pairing with soups or enjoyed on its own.
- Nutty Crust: Sprinkle a handful of sunflower or sesame seeds on top before baking for a crunchy and nutritious exterior that will surprise your taste buds.
- Sweeten the Deal: Incorporate 2 tablespoons of honey or sugar into the warm water for a subtly sweet loaf—wonderful for breakfast or snacking.
- Spicy Kick: Add 1 teaspoon of red pepper flakes or diced jalapeños to the dough for a spicy twist, perfect if you love a little heat with your bread!
- Cinnamon Sugar Variation: For a sweet treat, mix 2 teaspoons of cinnamon and 2 tablespoons of sugar together and sprinkle on the dough before baking. You’ll then have a delightful breakfast loaf.
- Flavorful Add-ins: Experiment by folding in cooked, chopped vegetables like spinach or peppers into the dough for additional flavor and a healthy boost that makes this bread truly unique.
Don’t forget to check out other delicious options like Barefoot Contessa Bread or Roasted Pear Flatbread to inspire your next bake!
Expert Tips for Easiest Yeast Bread
• Perfect Dough Consistency: Aim for a sticky dough; this is key for achieving the desired airy texture in your yeast bread.
• Warm Environment: Make sure your rising dough is in a warm spot to encourage yeast growth and bubbly texture.
• Avoid Overworking: When shaping your dough, handle it gently to preserve the air bubbles that help the bread rise.
• Dutch Oven Use: Though optional, using a Dutch oven creates a steam effect that significantly enhances the crust and moisture of your yeast bread.
• Flavor Boost: For added taste, consider incorporating herbs, spices, or cheese directly into the dough for a delightful twist.
Yeast Bread Recipe FAQs
What type of flour is best for yeast bread?
For the best results, I recommend using bread flour, which provides a chewier texture and better structure for your yeast bread. However, all-purpose flour works just fine, especially if you’re looking for a lighter, more tender loaf.
How should I store my yeast bread?
To keep your yeast bread fresh for up to 2 days, store it in a breadbox or wrap it in a clean kitchen towel. I suggest avoiding the fridge as it can cause the bread to stale faster! If you can’t finish it within that time, freezing is a great option.
Can I freeze my yeast bread?
Absolutely! To freeze your yeast bread, slice it first and place the slices in a resealable freezer bag, ensuring to press out as much air as possible to prevent freezer burn. Your bread will stay fresh for up to 3 months; when you’re ready to enjoy it, simply thaw it overnight in the fridge.
What should I do if my dough doesn’t rise?
If your dough isn’t rising, it could be due to the yeast being expired or not activated properly. Ensure to use warm water (about 110°F/43°C) when dissolving the yeast. If it’s still not rising, try moving the bowl to a warmer location or allowing it extra time, as colder temperatures can slow down yeast activity.
Can I make this bread gluten-free?
Yes, you can make a gluten-free version by using a gluten-free all-purpose flour blend. Just make sure that it contains xanthan gum or add a teaspoon to help with binding. Note that the texture may slightly differ, but it’ll still be a lovely yeast bread!
Is this recipe safe for my pet?
While the ingredients of yeast bread are safe for most pets, the rise from yeast can pose a risk if ingested in large amounts. It’s best to keep portions limited and consult your veterinarian if you’re unsure about sharing any bread with your furry friend.
Effortless Yeast Bread: Bake Your New Favorite Loaf Today
Ingredients
Equipment
Method
- In a large mixing bowl, combine 3 cups of flour, 1 teaspoon of active dry yeast, and 1.5 teaspoons of salt. Stir until evenly blended.
- Pour in 1.5 cups of warm water, stirring continuously until there are no dry flour patches left and the dough appears sticky.
- Cover the bowl tightly and set it in a warm area for 2 to 3 hours until the dough doubles in size.
- (Optional) Refrigerate the dough for up to 3 days for deeper flavor, bringing it to room temperature before baking.
- Preheat your oven to 450°F (230°C) with a Dutch oven inside for 30 minutes.
- Lightly dust a clean surface with flour and transfer the risen dough, shaping it gently.
- Fold the dough over itself six times to form a rough round shape.
- Transfer the dough seam-side down onto parchment paper.
- Place the dough in the preheated Dutch oven, cover with the lid, and bake for 30 minutes.
- Remove the lid and continue baking for an additional 12 minutes until golden brown.
- Let the bread cool on a wire rack for about 10 minutes before slicing.
Leave a Reply