
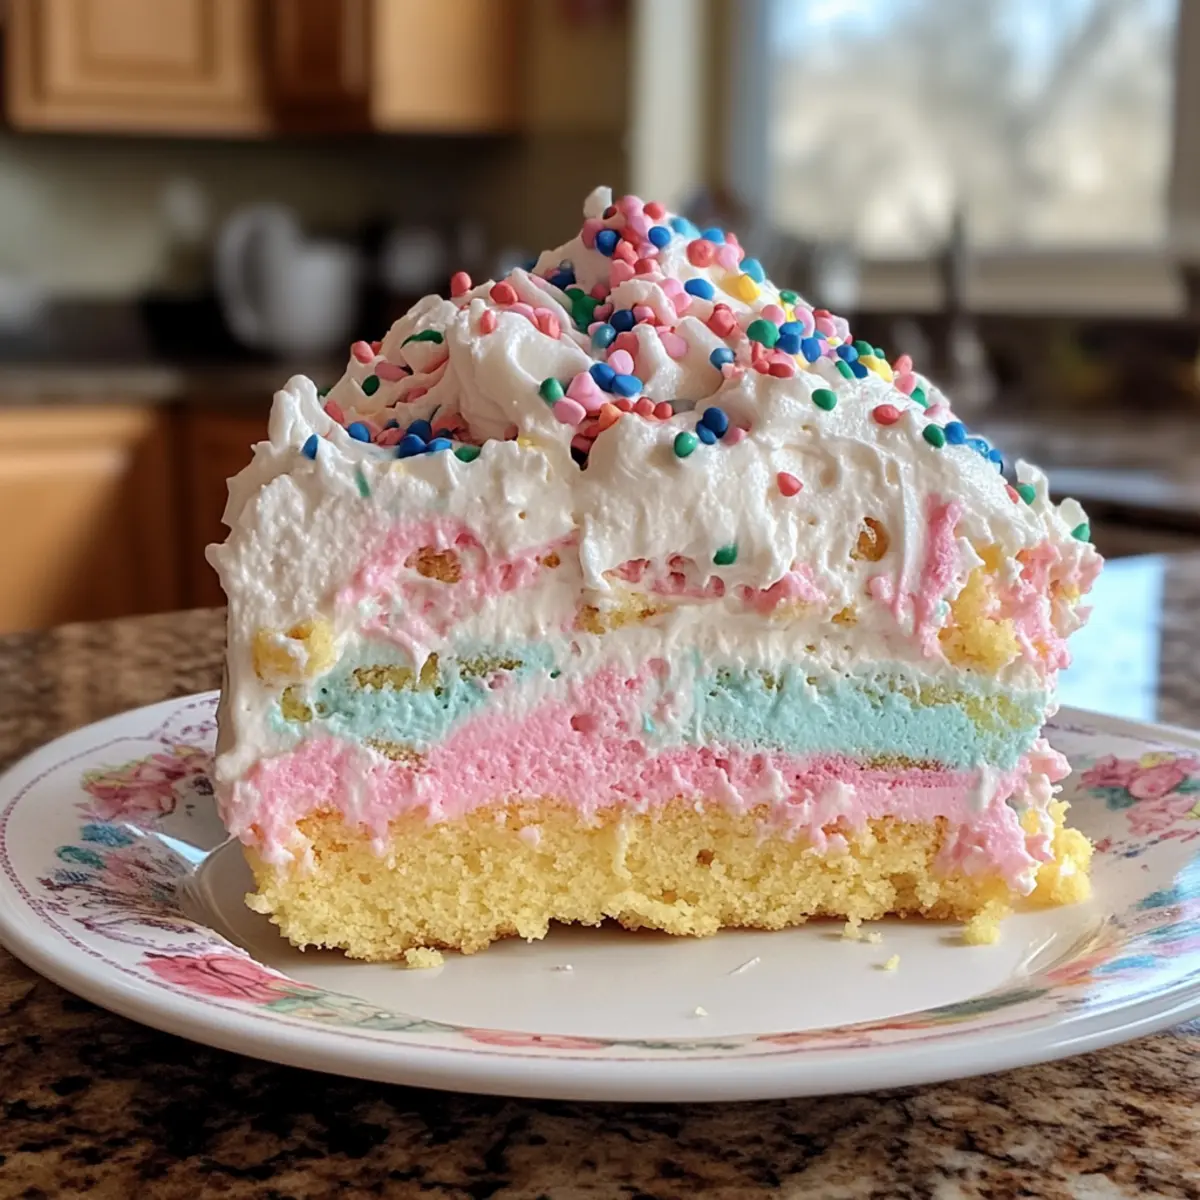
As the vibrant colors of spring unfurl, there’s something undeniably magical about gathering around a table filled with laughter and joy. This Easy Easter Poke Cake is my go-to dessert to bring that festive spirit to life. With a moist cake base infused with creamy vanilla pudding and topped with light and fluffy Cool Whip, it’s a treat that’s as delightful to serve as it is to eat. Not only is this dessert a visual feast with its playful pastel hues, but it’s also incredibly easy to whip up—perfect for both seasoned bakers and enthusiastic novices. Plus, the children will love the interactive decorating process! Are you ready to dive into a slice of this sweet delight that will have friends and family clamoring for seconds?

Why Is Easter Poke Cake a Must-Try?
Irresistibly Fun: This cake transforms traditional flavors into a vibrant, festive treat, making it a hit for any gathering.
Easy to Make: The simple steps ensure that anyone can achieve dessert bliss without fuss—a true crowd-pleaser.
Customization Galore: With various pudding flavors, feel free to get creative! Consider a zesty twist with lemon pudding or enchant with pistachio.
Kid-Friendly Fun: Let the little chefs join in decorating with sprinkles and berries, making it a delightful family activity while creating memories.
Perfect for Any Occasion: Whether at an Easter brunch or spring potluck, this colorful cake brings joy and smiles to the table! It’s the ideal companion to dishes like Autumn Pumpkin Cake or a slice of Cherry Pistachio Cheesecake.
Pre-Make Advantage: It’s great to prepare ahead; flavors develop beautifully overnight, ensuring a delicious balance when it’s time to serve.
Easter Poke Cake Ingredients
For the Cake
• Boxed White Cake Mix – This serves as the moist base; feel free to swap it with lemon or vanilla cake mix for a different flavor profile.
• Gel Food Coloring – Perfect for creating vibrant pastel swirls that make your Easter Poke Cake visually appealing; any food-safe coloring works well.
For the Pudding
• Instant Vanilla Pudding – Adds sapid moisture to the cake; you can easily use lemon or pistachio pudding for a unique twist.
• Cold Milk – Essential for preparing the pudding; opt for non-dairy milk for a lactose-free option.
For the Topping
• Cool Whip – The fluffy, creamy layer that tops the cake; homemade whipped cream is a wonderful substitute if desired.
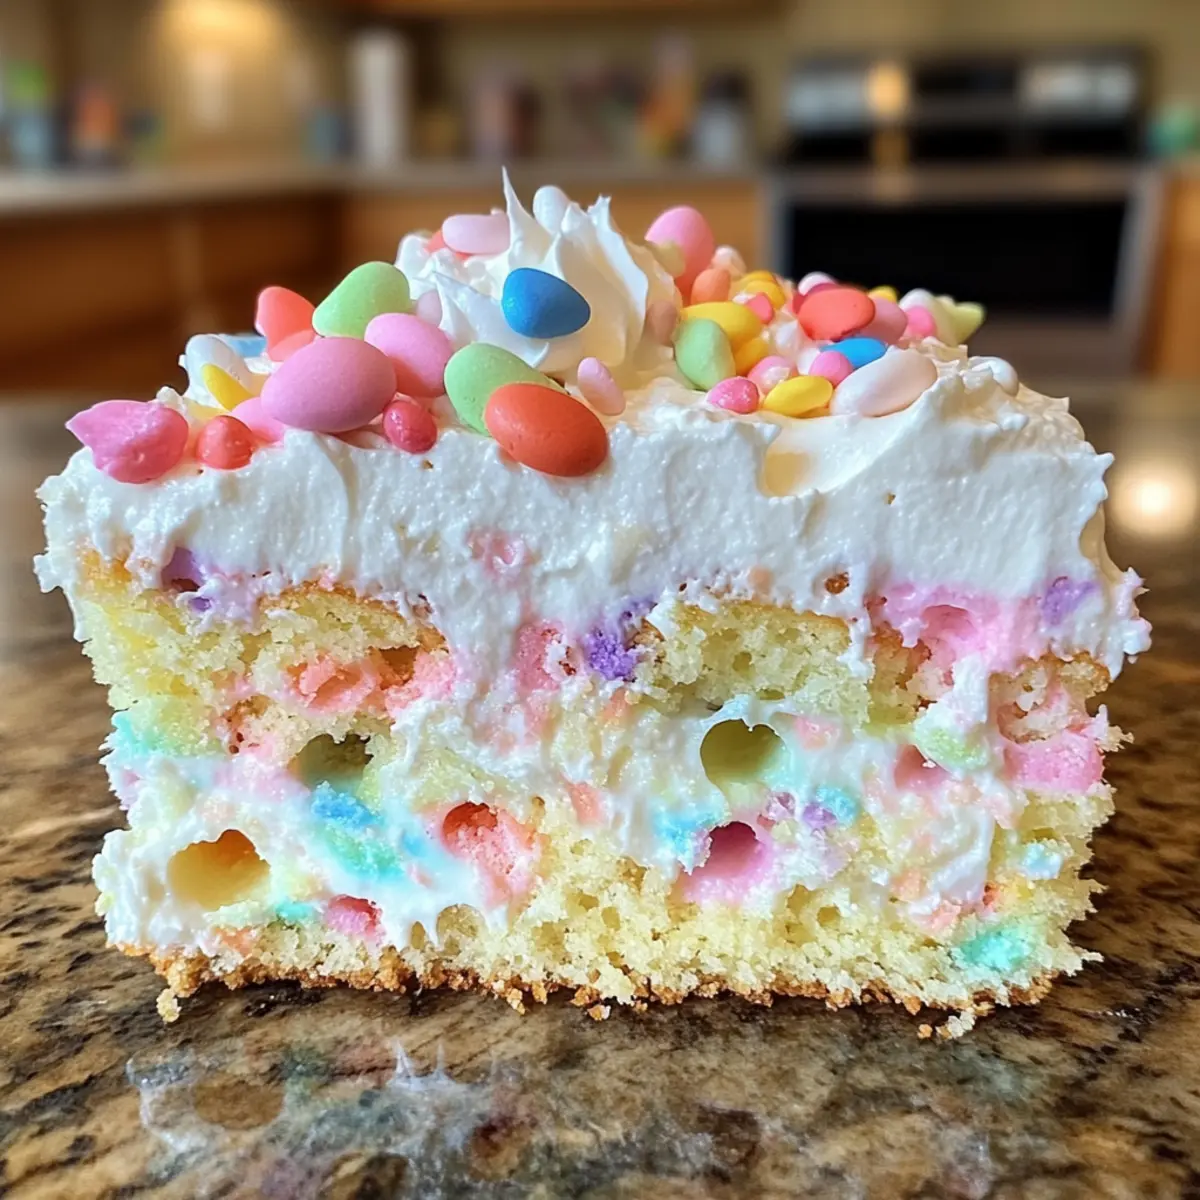
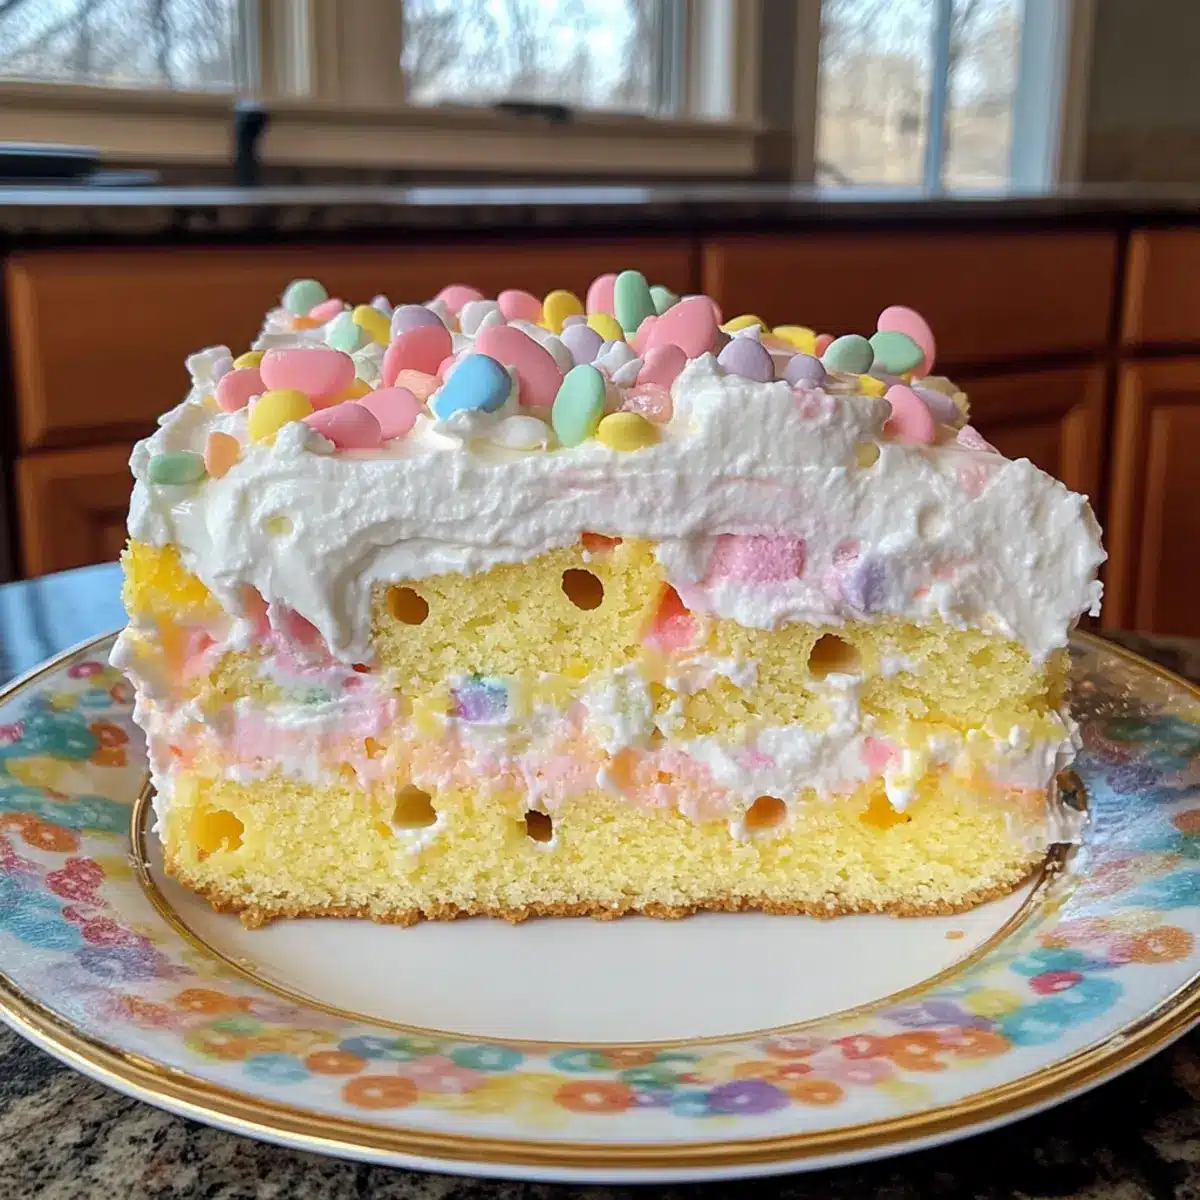
• Easter Sprinkles & Berries – These fun toppings create an eye-catching finish; you can also add chocolate eggs or coconut for added flair.
Step‑by‑Step Instructions for Easter Poke Cake
Step 1: Preheat and Prepare Your Baking Pan
Preheat your oven to 350°F (175°C) and generously grease a 9×13-inch baking pan to prevent sticking. This important first step ensures that your Easter Poke Cake will bake evenly and come out perfectly from the pan, ready for all the delicious flavors to come.
Step 2: Mix the Cake Batter
Following the instructions on the boxed white cake mix, prepare the batter and divide it into 3-4 separate bowls. This will help you create colorful layers; make sure to blend the batter thoroughly, so it’s smooth before you start adding colors. Each bowl will become a vibrant hue, perfect for your festive creation.
Step 3: Add the Food Coloring
Use gel food coloring to tint each bowl of batter, ensuring you mix gently to maintain a light, airy texture. Aim for pastel colors that will look beautiful in your Easter Poke Cake; avoid overmixing to keep the color distinct and vibrant. You’re creating a delightful rainbow that brings spring to life!
Step 4: Create a Marble Effect
Spoon the colored batters into the greased baking pan randomly, allowing the colors to mingle, but don’t mix them too much. To enhance the marbled effect, take a knife and make gentle swirling motions throughout the batter. This technique will create a beautiful layered appearance once baked.
Step 5: Bake the Cake
Place the pan in the preheated oven and bake for 28-32 minutes, or until a toothpick inserted into the center comes out clean. As the Easter Poke Cake bakes, your kitchen will fill with the warm scent of vanilla. Keep an eye on it so it doesn’t overbake—golden edges are the goal!
Step 6: Cool the Cake
Once baked, remove the cake from the oven and let it cool in the pan for 15-20 minutes. This cooling period is essential; it allows the cake to firm up just enough so you can handle it without it falling apart. You’ll know it’s ready when it’s warm but no longer hot to the touch.
Step 7: Poke Holes in the Cake
Using the handle of a wooden spoon, carefully poke holes in the cake at 1-inch intervals. These holes are crucial for soaking up the creamy pudding later, adding moisture and flavor to your Easter Poke Cake. Make sure to space the holes evenly for the best results.
Step 8: Prepare the Pudding
In a mixing bowl, whisk together the instant vanilla pudding mix and cold milk until smooth. The pudding should be thick while still pourable; this will seep into the holes you poked earlier, infusing your cake with delicious flavor. Aim for a creamy consistency that will enhance the overall texture.
Step 9: Pour Pudding Over the Cake
Carefully pour the prepared pudding over the cooled cake, ensuring it fills all the holes. Gently shake the pan to help the pudding settle, allowing it to soak in for maximum flavor and moisture. This step transforms your Easter Poke Cake into a luxurious dessert that will impress your guests.
Step 10: Refrigerate to Set
Cover the cake with plastic wrap and refrigerate for a minimum of 2 hours, preferably overnight. Chilling allows the flavors to meld beautifully while giving the pudding time to set, making each slice a dreamy, creamy delight. This is one of the best aspects of your Easter Poke Cake!
Step 11: Add the Topping
Once set, remove the cake from the refrigerator and spread a generous layer of Cool Whip on top. Use a spatula to create an even layer, ensuring it covers the entire surface. Feel free to swirl and create patterns for a decorative touch that enhances the festive look of your cake.
Step 12: Decorate and Serve
Finish your Easter Poke Cake by sprinkling Easter-themed decorations like sprinkles and fresh berries on top. Keep the cake chilled until it’s time to serve, and watch as it becomes the star of your festive gathering, inviting everyone to dive into a slice of joy!
Make Ahead Options
These Easter Poke Cake preparations are perfect for busy home cooks looking to save time without sacrificing flavor! You can bake the cake up to 24 hours in advance, allowing the flavors to settle beautifully. Once cooled, poke the holes and pour the pudding over, then refrigerate the whole cake. If you’d like, you can also prepare the pudding mix (just don’t let it set) and store it separately in the fridge until you’re ready to complete the cake. When it’s time to serve, simply spread the Cool Whip on top, add your favorite decorations, and your Easter Poke Cake will be ready to dazzle your guests, just as delicious as if made fresh!
How to Store and Freeze Easter Poke Cake
Fridge: Store the Easter Poke Cake in an airtight container or cover with plastic wrap; it will keep fresh for up to 3 days.
Freezer: To freeze, slice the cake into portions and wrap each piece tightly in plastic wrap, then place in a freezer-safe container. It can last up to 2 months.
Thawing: When ready to enjoy, thaw the cake in the refrigerator overnight for best texture. Avoid microwaving, as this can compromise the pudding’s creamy consistency.
Reheating: If you prefer a warm dessert, reheat individual slices in the microwave for 10-15 seconds once thawed, but it’s best enjoyed chilled for that refreshing taste!
Easter Poke Cake Variations & Substitutions
Let your creativity shine as you customize this delightful Easter dessert with various swaps and twists!
-
Lemon Twist: Swap the vanilla pudding for instant lemon pudding for a refreshing zing. This bright flavor complements the cake beautifully.
-
Pistachio Delight: Consider using pistachio pudding instead of vanilla for a rich nutty flavor, adding a subtle green hue that fits the spring theme.
-
Dairy-Free Option: Replace cold milk with almond, coconut, or oat milk to make a dairy-free version of this festive poke cake.
-
Fruit Layers: Amp up freshness by layering in sliced strawberries or raspberries between the pudding and Cool Whip for a burst of fruity flavor.
-
Chocolate Indulgence: For chocolate lovers, substitute half of the cake mix with chocolate cake mix and use chocolate pudding to transform this dessert into a chocolate lover’s paradise.
-
Nut Topping: Add a crispy layer by sprinkling chopped nuts like walnuts or pecans on top of the Cool Whip before adding your sprinkles for a delightful crunch.
-
Coconut Infusion: Incorporate shredded coconut either in the pudding or as a topping for a tropical twist that pairs perfectly with the cake’s lightness.
-
Candy Bar Surprise: Crush your favorite candy bars, like Mini Eggs or Cadbury Creme Eggs, and sprinkle them on top for a fun surprise that adds texture and enhances the cake’s festive vibe.
For a showstopper dessert, pair this Easter Poke Cake with a slice of Butter Pecan Cake or a refreshing Pumpkin Pie Cheesecake for dessert that everyone will adore!
Expert Tips for Easter Poke Cake
Pudding Consistency Matters: Ensure the pudding is pourable but not too thick before pouring it over the cake. If it sets too much, it’ll not soak in properly.
Avoid Overmixing: When adding food coloring to the cake batter, mix gently to keep the colors vibrant and maintain a fluffy texture.
Poking Holes Technique: Use the handle of a wooden spoon to poke even holes in the cake; this allows the pudding to seep in effectively, ensuring every bite is flavorful.
Refrigeration Is Key: For best results, refrigerate overnight. This allows the flavors to meld beautifully, transforming your Easter Poke Cake into a luxurious dessert.
Decorate with Care: When adding Cool Whip and toppings, work gently to preserve the cake’s layers and colors, making your Easter Poke Cake a festive centerpiece for your gathering.
What to Serve with Easter Poke Cake
As you gather your loved ones around the table, enhancing your Easter Poke Cake experience with delightful accompaniments will add even more joy to your celebration.
-
Fresh Fruit Salad: A light medley of vibrant fruits complements the sweet cake, providing a refreshing contrast that brightens the overall dessert spread. Think of strawberries, blueberries, and kiwi for a pop of color.
-
Fluffy Whipped Cream: Serve extra whipped cream on the side for those who crave an even creamier dessert experience. It’s a classic pairing that never disappoints and adds an indulgent touch.
-
Chocolate Ice Cream: The rich, creamy texture of chocolate ice cream paired with the cake creates a luscious combination, perfect for those with a sweet tooth. Just imagine the delicious mingling of flavors!
-
Iced Tea: A chilled glass of sweetened iced tea brings a refreshing balance to the festive sweetness of your dessert. Its subtle flavors will cleanse the palate beautifully between bites.
-
Pistachio Muffins: These nutty delights offer a pleasing crunch and contrast to the moist cake, creating a delightful variety on your dessert table. The distinct flavors will surely spark curiosity among your guests.
-
Mini Cheesecakes: A selection of bite-sized cheesecake treats can offer delightful richness alongside the light Easter Poke Cake. The combination is bound to keep everyone pleased and stuffed.
-
Lemonade Spritzers: Light and bubbly, these refreshing drinks are a perfect match for the sweet cake. The citrus notes of lemonade brighten the entire meal, making it feel celebratory.
-
Carrot Cake Cookies: These chewy, spiced cookies tie in nicely with the Easter theme, adding a touch of nostalgia to your gathering. Their delightful texture pairs wonderfully with the creamy cake.
Easter Poke Cake Recipe FAQs
How do I choose the right cake mix?
Absolutely! You can select a boxed white cake mix as your base, but if you’re feeling adventurous, try using a lemon or vanilla cake mix for a different flavor profile. Just ensure that the mix you choose is compatible with pudding, as that’s where the magic happens!
How long does the Easter Poke Cake last in the fridge?
The Easter Poke Cake will stay fresh for up to 3 days when stored properly in an airtight container or covered with plastic wrap. It’s like a little time capsule of flavor, just waiting for you to savor!
Can I freeze leftover Easter Poke Cake?
Very! To freeze your Easter Poke Cake, slice it into individual portions to make it more manageable. Wrap each slice tightly in plastic wrap and place them in a freezer-safe container. It can last up to 2 months, and when you’re ready to enjoy, simply thaw the slices in the refrigerator overnight for the best texture.
What should I do if my pudding isn’t pourable?
No worries! If your pudding sets too quickly, try adding a little more cold milk, whisking until smooth and pourable again. If you find it still isn’t blending well, slowly heat it in a saucepan over low heat while stirring continuously until it reaches the desired consistency. This will help bring it back to life for that delicious soaking action!
Are there any dietary considerations for my Easter Poke Cake?
Absolutely! For those with lactose sensitivities, you can easily substitute the cold milk with a non-dairy milk option. If you’re serving guests with allergies, always check the labels on your boxed cake mix and pudding mix to ensure they’re allergen-free, as some may contain nuts or gluten.
Can I adjust the sweetness of the Cool Whip topping?
Of course! If you prefer a less sweet topping, you can make homemade whipped cream using heavy cream and sugar, adjusting the sugar content to your liking. Just whip the cream until it reaches stiff peaks and you’ve got a delicious, tailored topping that’s great for your Easter Poke Cake!
Deliciously Colorful Easter Poke Cake for Spring Celebrations
Ingredients
Equipment
Method
- Preheat your oven to 350°F (175°C) and grease a 9x13-inch baking pan.
- Prepare the cake batter according to the boxed cake mix instructions and divide into 3-4 bowls.
- Add gel food coloring to each bowl, mixing gently to maintain an airy texture.
- Spoon the colored batters into the baking pan randomly to create a marbled effect.
- Bake for 28-32 minutes or until a toothpick comes out clean.
- Cool the cake in the pan for 15-20 minutes before handling.
- Poke holes in the cake at 1-inch intervals using the handle of a wooden spoon.
- In a bowl, whisk together the pudding mix and cold milk until smooth.
- Pour the pudding over the cooled cake, filling all the holes.
- Cover with plastic wrap and refrigerate for a minimum of 2 hours or overnight.
- Spread Cool Whip on top before serving and decorate with sprinkles and berries.
Leave a Reply