
As I walked into a quaint little bakery tucked away in a bustling Tokyo street, the sweet scent of strawberries filled the air and immediately caught my attention. That day, I discovered the magic of Japanese Strawberry Cake—a delight that strikes the perfect harmony between light and fluffy. With its moist texture and a whipped cream frosting that’s not overly sweet, this cake has a way of transforming any ordinary day into a celebration. Not only is this recipe quick to whip up, but it also invites versatility with options for stabilized and non-stabilized frosting, catering to all kinds of baking enthusiasts. Are you ready to elevate your dessert game with this irresistible Japanese bakery-style strawberry cake? Let’s dive into the delightful details!
Why is this cake a must-try?
Heavenly Texture: The cake is remarkably light and airy, making it feel like a blissful cloud with every bite.
Versatile Options: Choose between stabilized and non-stabilized whipped cream frosting to suit your preference, adding a personal touch to each creation.
Quick and Easy: With straightforward steps, this recipe is perfect for both novice and experienced bakers looking to impress.
Bursting with Flavor: Fresh strawberries shine in this recipe, creating a delightful contrast to the subtly sweet whipped cream.
Cultural Fusion: Enjoy a dessert that reflects the elegance of Japanese baking, capturing hearts and taste buds alike, just like my favorite Autumn Pumpkin Cake!
Japanese Strawberry Cake Ingredients
Dive into this delightful cake with the perfect ingredients!
For the Cake
- Whole Milk – Provides moisture and structure to the cake; substitute with almond milk for a lactose-free option.
- Unsalted Butter – Adds richness and tenderness; can be replaced with oil for a dairy-free version.
- Cake Flour – Ensures a soft, delicate crumb; substitute with all-purpose flour, adding a tablespoon of cornstarch to mimic the texture.
- Egg Yolks (4) – Contributes fat and moisture; for an egg-free version, consider using 1/4 cup applesauce for each yolk.
- Egg Whites (4) – Whipped to create volume and fluffiness; cannot be substituted for structural integrity.
- Caster Sugar (70 g) – Enhances sweetness and helps create a fluffy texture; granulated sugar is a suitable alternative.
- Strawberries (340 g to 450 g) – Fresh fruit for decoration and flavor; feel free to swap with raspberries or blueberries if desired.
- Sugar (1 1/2 tsp) – Used for macerating strawberries; can be omitted for less sweetness.
- Sugar (2 tbsp) and Hot Water (3 tbsp) – Used to create a moisture-boosting cake syrup; can be skipped if not desired.
For the Whipped Cream Frosting
- Heavy Whipping Cream (280 g) – The base for your whipped cream frosting; coconut cream works for a dairy-free option.
- Confectioners Sugar (2 tbsp) – Sweetens the whipped cream and helps maintain its structure; granulated sugar can be used, though texture will differ.
- Gelatin (3/4 tsp, optional) – Stabilizes the whipped cream for longer-lasting texture; skip this for non-stabilized cream.
- Cold Water (2 tbsp, optional) – Activates gelatin; not necessary if you are omitting gelatin.
With these ingredients, you’ll create a stunning Japanese Strawberry Cake that charms with every fluffy bite!
Step‑by‑Step Instructions for Japanese Strawberry Cake
Step 1: Preheat and Prepare
Begin by preheating your oven to 325°F (160°C). While the oven warms up, line a round cake pan with parchment paper to prevent sticking, and set up a water bath by placing a larger dish filled with hot water in the oven. This will help create a moist baking environment, essential for a fluffy Japanese Strawberry Cake.
Step 2: Combine Milk and Butter
In a saucepan, combine whole milk and unsalted butter over low heat until melted and smooth. Carefully stir in sifted cake flour, mixing until no clumps remain. Remove from heat, and then let the mixture cool slightly before gradually adding in the egg yolks, whisking continuously to maintain a creamy consistency.
Step 3: Whip Egg Whites
In a separate clean bowl, beat the egg whites using an electric mixer on medium speed until frothy. Gradually add caster sugar while continuing to whip until you achieve medium peaks; this should take about 3–5 minutes. The airy texture from the egg whites is key to the fluffiness of your Japanese Strawberry Cake.
Step 4: Fold Mixtures Together
Gently fold the beaten egg whites into the yolk mixture using a spatula, taking care not to deflate the whipped mixture. This step is crucial for ensuring the cake rises beautifully, resulting in a light and airy structure. The blended batter should look fluffy and well combined without any visible egg whites.
Step 5: Bake the Cake
Pour the batter into the prepared cake pan, tapping it gently to remove any air bubbles. Place the cake pan into the preheated oven inside the water bath, baking for approximately 1 hour and 30 minutes. A skewer inserted into the center should come out clean when the Japanese Strawberry Cake is perfectly baked.
Step 6: Cool the Cake
Once baked, carefully remove the cake from the oven and water bath. Allow it to cool in the pan for about 15 minutes before flipping it out onto a cooling rack. Let the cake cool completely at room temperature, ensuring a stable foundation for layering and frosting later.
Step 7: Prepare Strawberries
While your cake cools, slice the fresh strawberries, tossing them with a sprinkle of sugar in a bowl. Let the berries macerate for at least one hour to enhance their natural sweetness, which will beautifully complement the cake and whipped cream frosting.
Step 8: Make Whipped Cream Frosting
For the whipped cream frosting, whip heavy cream in a chilled bowl until soft peaks form. Gradually add confectioners sugar, continuing to whip until you achieve stiff peaks. For stabilized cream, follow the optional gelatin method, heating it with cold water, mixing it in once dissolved to maintain texture during serving.
Step 9: Assemble the Cake
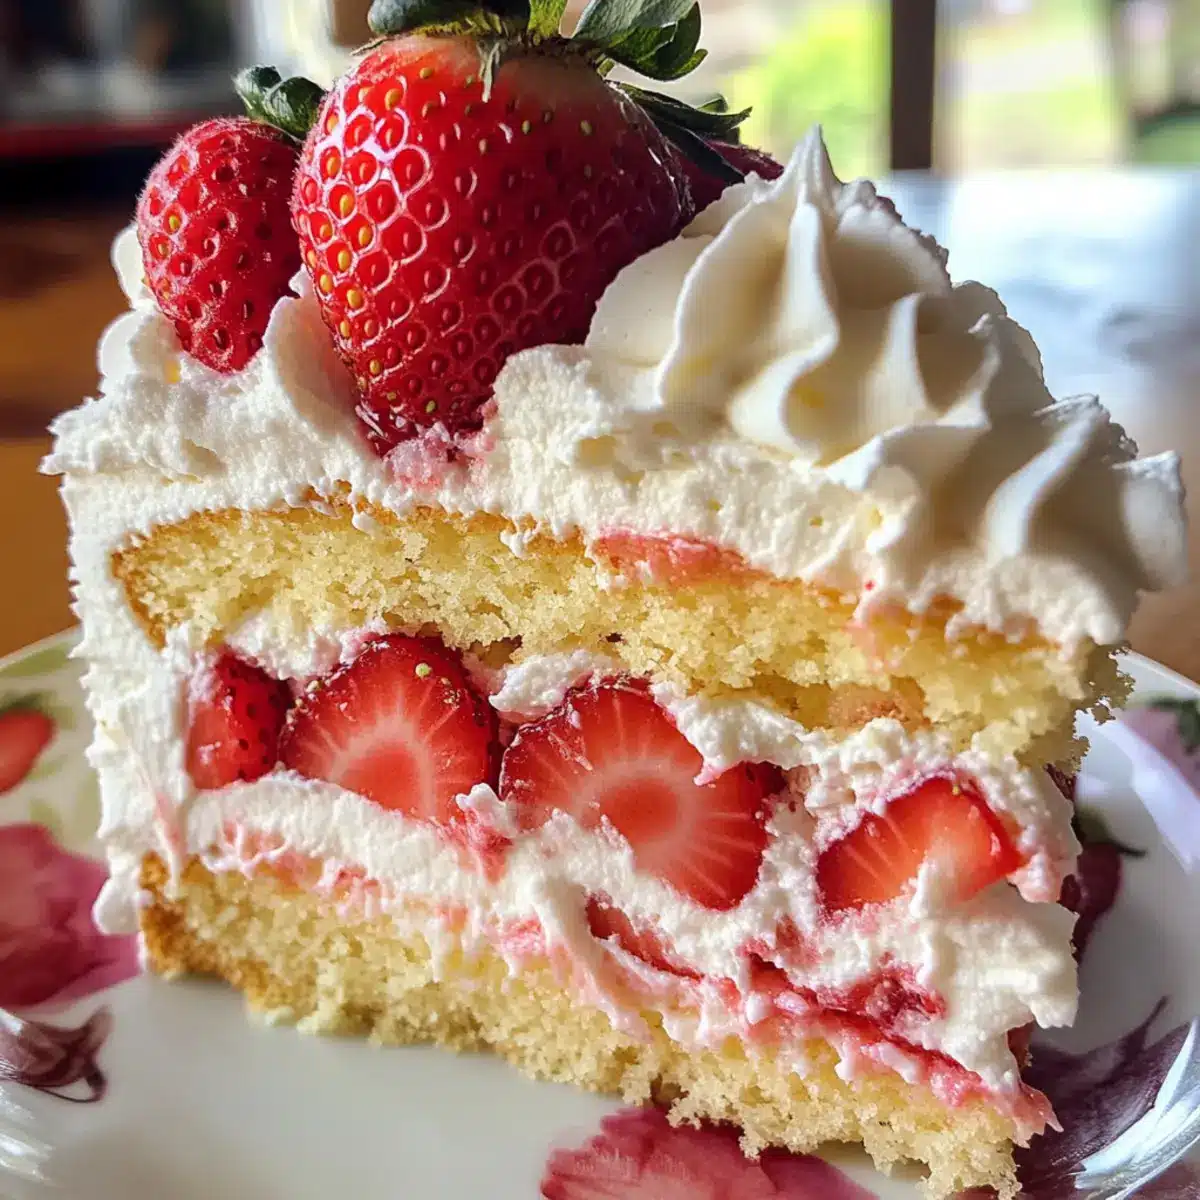
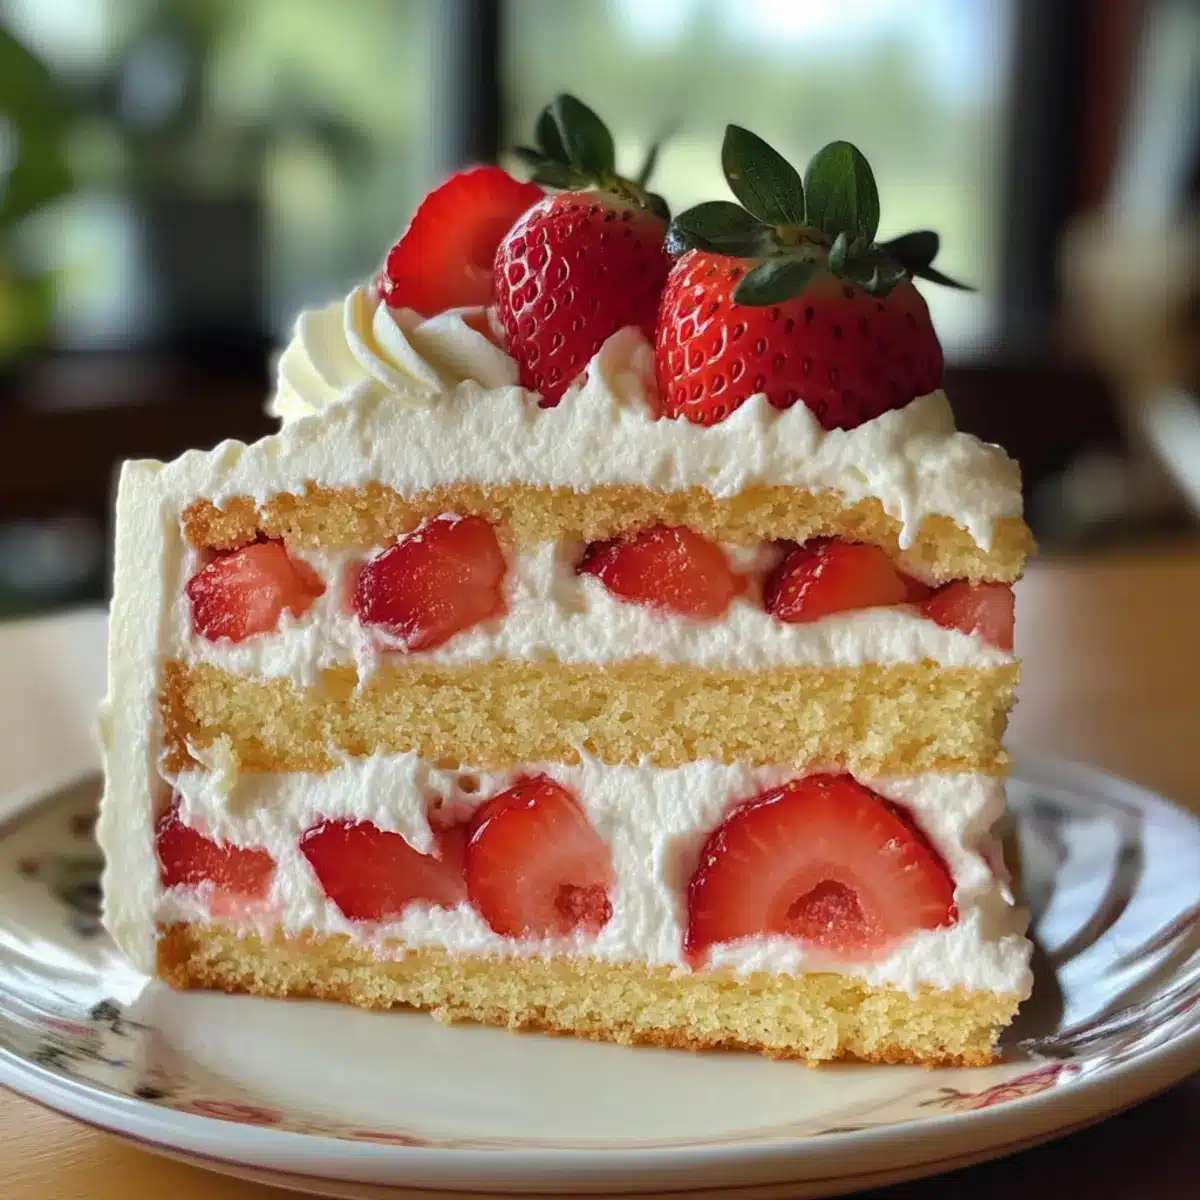
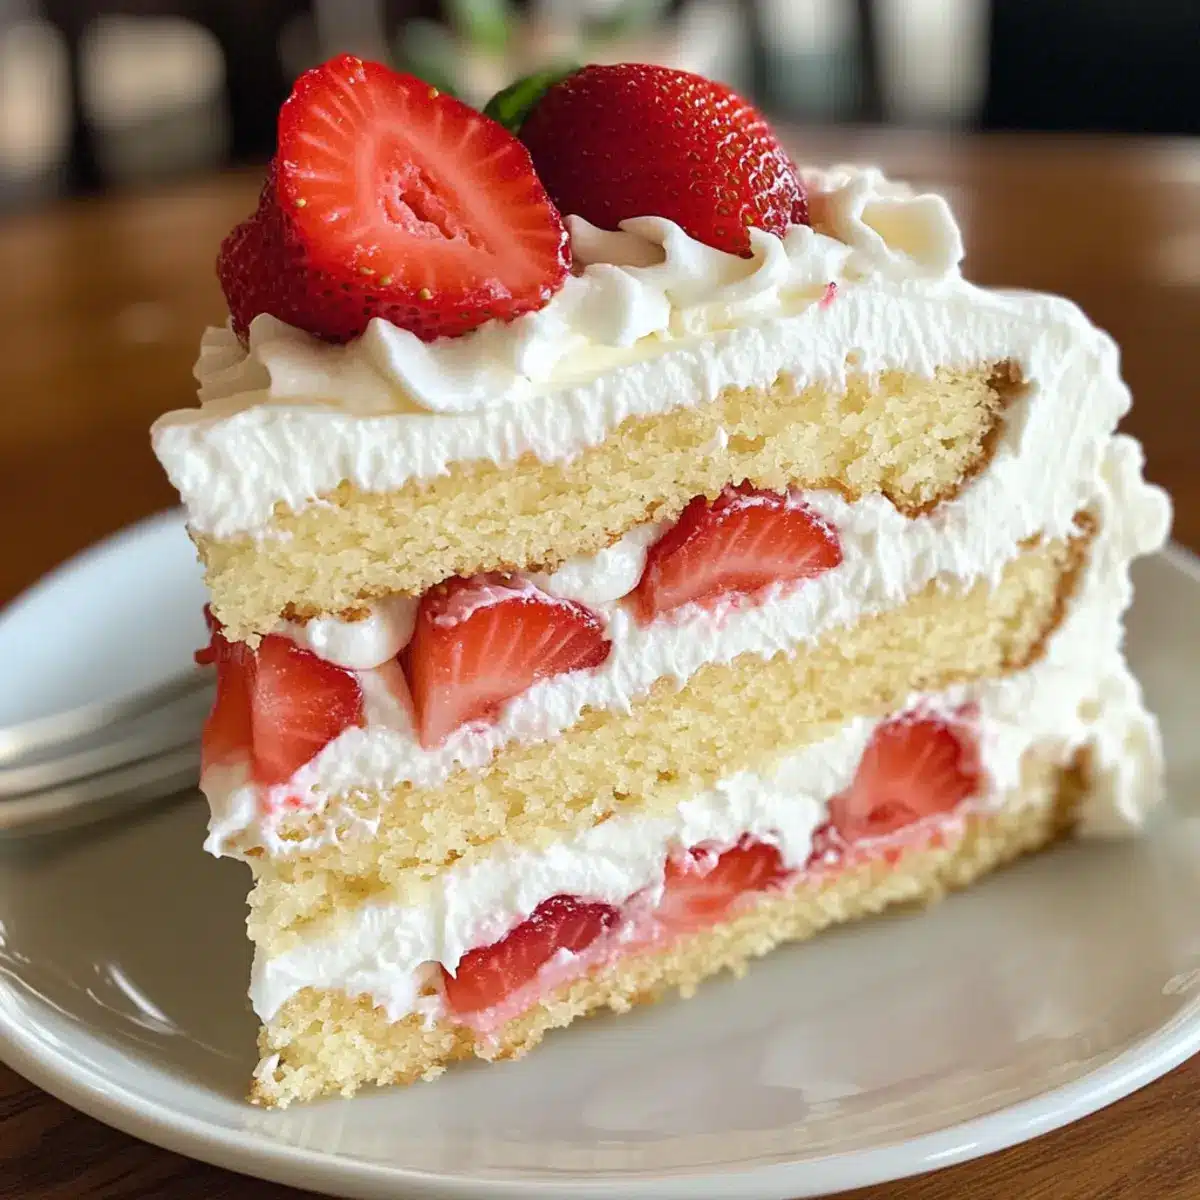
Once the cake is cooled, carefully slice it into layers. Brush each layer lightly with the reserved cake syrup (sugar and hot water) for moisture. Spread a generous layer of whipped cream followed by macerated strawberries between each layer, stacking them gently. Finish by frosting the top and sides of the assembled cake with the remaining whipped cream.
Step 10: Chill and Serve
After assembling your Japanese Strawberry Cake, refrigerate it for at least 30 minutes if using stabilized cream. This chilling allows the cake to set and ensures neat slices. When ready to serve, cut into wedges, revealing the delightful layers of strawberries and whipped cream—enjoy the light, luscious experience!
Tips for the Best Japanese Strawberry Cake
• Precision Matters: Use a kitchen scale to weigh your ingredients accurately, ensuring your cake’s light and fluffy texture comes out just right.
• Oven Temperature Check: Always use an oven thermometer to verify your oven’s temperature; an incorrect temperature can lead to uneven baking.
• Egg White Whipping: Stop whipping the egg whites at medium peaks to avoid over-whipping, which can hinder the rise of your Japanese strawberry cake.
• Gentle Folding: Use a gentle folding technique when combining the batters to maintain the airiness essential for achieving the perfect fluffy cake texture.
• Moisturize Wisely: Brush each cake layer with the syrup to prevent dryness, giving your Japanese strawberry cake an extra layer of delicious moisture.
How to Store and Freeze Japanese Strawberry Cake
- Fridge: Store your cake in an airtight container for up to 3 days. If using stabilized whipped cream, the texture remains intact longer, ensuring every slice feels fresh.
- Freezer: To freeze, wrap slices tightly in plastic wrap and then place in a freezer-safe bag for up to 2 months. Thaw in the refrigerator before serving for the best experience.
- Reheating: For a warm treat, gently reheat individual slices in the microwave for about 10-15 seconds. Enjoy the delightful flavors as if it were freshly baked!
Japanese Strawberry Cake Variations
Feel free to play with this delightful Japanese Strawberry Cake recipe to suit your taste and dietary needs!
-
Dairy-Free: Substitute whole milk with almond or oat milk and use coconut cream for frosting to keep it dairy-free without losing flavor.
-
Gluten-Free: Swap cake flour for a gluten-free blend of your choice, ensuring it has a good starch content for that airy texture.
-
Egg-Free: Use 1/4 cup of unsweetened applesauce for each egg yolk and a little aquafaba (whipped chickpea water) for the egg whites to maintain fluffiness.
-
Berry Bliss: Instead of strawberries, try blueberries, raspberries, or a mixture of berries for a colorful and extra flavorful cake; each berry brings its unique sweetness!
-
Luxurious Chocolate: Add cocoa powder to the flour mixture for a chocolatey twist, and consider layering the cake with a chocolate ganache frosting for a decadent experience.
-
Flavor Infusion: For a unique touch, infuse the whipped cream with vanilla, matcha, or almond extract, giving an exciting flavor profile that complements the strawberries.
-
Nutty Crunch: Fold in crushed nuts, such as almonds or hazelnuts, into the batter for an added crunch that pairs beautifully with the lightness of the cake.
These variations invite you to explore and delight in every bite of your homemade creation—just as I do when I whip up my favorite Cherry Pistachio Cheesecake for a gathering!
What to Serve with Fluffy Japanese Bakery-Style Strawberry Cake
Indulge in a delightful culinary experience as you round out your meal with perfect pairings.
- Refreshing Green Tea: A traditional companion that cleanses the palate while highlighting the cake’s delicate sweetness.
- Zesty Lemon Sorbet: Its tartness wonderfully contrasts the cake’s airy fluffiness, adding a refreshing twist to your dessert table.
- Light Fruit Salad: A mix of seasonal fruits can enhance the fresh strawberry flavors. Think juicy melons, ripe peaches, and tangy citrus!
- Crispy Asian Spring Rolls: The crunch from these savory rolls adds a delightful textural contrast, making your meal both exciting and balanced.
- Decadent Matcha Latte: Creamy and slightly bitter, this drink pairs beautifully with the fluffy sweetness, creating a harmonious fusion of flavors.
- Smooth Vanilla Ice Cream: A classic pairing that melts into the cake’s layers, adding richness and enhancing the overall experience with creamy delight.
- Honeyed Yogurt: A creamy dollop on the side elevates each bite, making for a wholesome yet indulgent complement to the sweetness of the cake.
- Sparkling Water with Mint: A fizz that refreshes your palate and lightens your meal, making every bite of cake feel even more indulgent.
Make Ahead Options
Enjoy the convenience of preparing your Japanese Bakery-Style Strawberry Cake ahead of time! You can bake the cake and store it, wrapped tightly in plastic wrap, in the refrigerator for up to 3 days. For even more time-saving, you can macerate the strawberries and whip the cream (stabilized if desired) up to 24 hours in advance, ensuring those delicious flavors meld beautifully. When you’re ready to serve, simply layer the components together and chill for 30 minutes if using stabilized cream. This way, you can host effortless gatherings with a dessert that’s just as delightful, relieving stress without sacrificing the quality.
Japanese Strawberry Cake Recipe FAQs
How do I choose ripe strawberries for this cake?
Absolutely! Look for strawberries that are bright red, firm, and have a natural shine. Avoid those with dark spots or bruises, as they indicate overripeness. The best strawberries for your Japanese Strawberry Cake will also have a sweet smell, signaling their flavor is at its peak.
What’s the best way to store leftover Japanese Strawberry Cake?
To keep your cake fresh, place it in an airtight container in the refrigerator for up to 3 days. If you used stabilized whipped cream, this will help maintain the texture for even longer. When you’re ready to enjoy another slice, just pull it out and it’s good to go!
Can I freeze the Japanese Strawberry Cake?
Yes, you can freeze it! To do so, wrap each slice in plastic wrap tightly, then place the wrapped slices in a freezer-safe bag. The cake can be stored for up to 2 months. When you’re ready to indulge again, simply thaw the slices in the fridge overnight or for a couple of hours at room temperature for the best taste and texture.
What should I do if my egg whites don’t reach stiff peaks?
Very good question! Begin by ensuring your mixing bowl is completely clean and free from any grease. Beating egg whites at a high speed will help, but if they still won’t whip up, they might not be fresh enough. If they do form soft peaks, you can still use them, but the cake may not be as fluffy. It’s all about the gentle folding and care in your mixing process!
Is this cake suitable for people with dietary restrictions?
Definitely! This Japanese Strawberry Cake can be made vegetarian-friendly by skipping the gelatin in the whipped cream frosting. Additionally, you can replace milk with almond milk for a lactose-free option and use applesauce for the egg yolks to prepare it for an egg-free version. It’s always good to offer variations that accommodate different dietary needs.

Heavenly Japanese Strawberry Cake That Melts in Your Mouth
Ingredients
Equipment
Method
- Preheat your oven to 325°F (160°C) and line a round cake pan with parchment paper.
- In a saucepan, combine whole milk and unsalted butter over low heat until melted. Stir in sifted cake flour until smooth.
- Whip egg whites until frothy, then gradually add caster sugar until reaching medium peaks.
- Fold the whipped egg whites into the yolk mixture gently to maintain fluffiness.
- Pour the batter into the pan, tap to remove air bubbles, and bake in the oven for approximately 1 hour and 30 minutes.
- Allow the cake to cool in the pan for 15 minutes, then transfer to a cooling rack.
- Slice the fresh strawberries, toss with sugar, and let macerate for at least one hour.
- Whip the heavy cream with confectioners sugar until stiff peaks form, optionally mix in gelatin.
- Slice the cooled cake, brush each layer with syrup, and layer with whipped cream and strawberries.
- Refrigerate for at least 30 minutes before serving to set the cake.
Leave a Reply